|
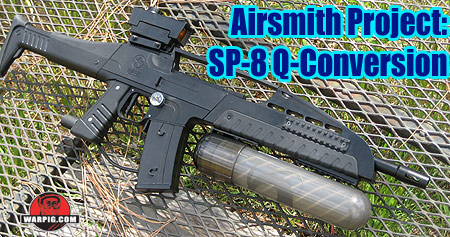
Airsmith Project:
SP-8 Q Conversion
by Bill Mills - Photos by Dawn Mills - May 2007
Page 1 Page 2
Continued from Page1
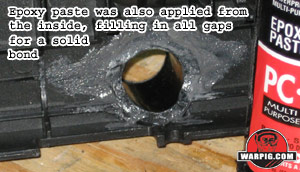 After the epoxy paste had set for an hour or two, it could be smoothed and contoured with a wetted fingertip. [Author's note – PC-7 is handy stuff – in the 80s, myself and several team-mates cut the centers out of oil can lids, and epoxy pasted them onto our Splatmasters, using the oil cans as hoppers instead of the 10-round tube feed in the marker's body – then companies started actually making hoppers so you could buy them instead of DIY.] After the epoxy paste had set for an hour or two, it could be smoothed and contoured with a wetted fingertip. [Author's note – PC-7 is handy stuff – in the 80s, myself and several team-mates cut the centers out of oil can lids, and epoxy pasted them onto our Splatmasters, using the oil cans as hoppers instead of the 10-round tube feed in the marker's body – then companies started actually making hoppers so you could buy them instead of DIY.]
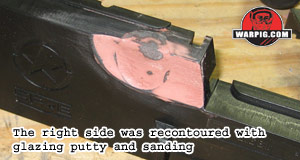 After a 24-hour cure on the epoxy paste, the right upper receiver half got some additional dressing up. A couple of high points on the epoxy paste were carved away, then three or four passes of automotive glazing putty and sanding were used until a smooth contour was obtained. After a 24-hour cure on the epoxy paste, the right upper receiver half got some additional dressing up. A couple of high points on the epoxy paste were carved away, then three or four passes of automotive glazing putty and sanding were used until a smooth contour was obtained.
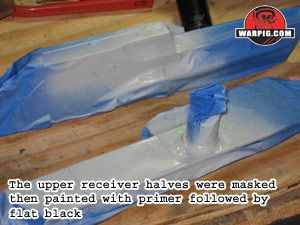 Both halves of the upper receiver were then re-masked with wide painter's masking tape – including the feedneck. After sanding, they were sprayed with primer, lightly sanded, then sprayed with a couple of coats of flat black enamel – each being allowed to fully sun dry before the next was applied. Both halves of the upper receiver were then re-masked with wide painter's masking tape – including the feedneck. After sanding, they were sprayed with primer, lightly sanded, then sprayed with a couple of coats of flat black enamel – each being allowed to fully sun dry before the next was applied.
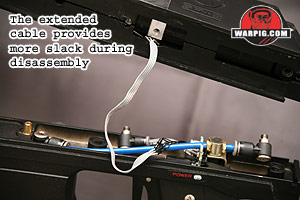
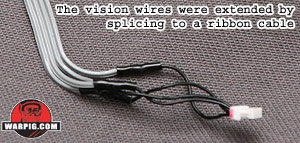 While the stock Vision eye wiring harness would probably reach to the new position of the Vision board, it would not leave much room to work when disassembling the marker. To facilitate easier maintenance, the Vision wiring harness was extended, by splicing in a section of 4-wire ribbon cable (actually a 4 wire segment stripped from a scrapped IDE hard drive cable.) While the stock Vision eye wiring harness would probably reach to the new position of the Vision board, it would not leave much room to work when disassembling the marker. To facilitate easier maintenance, the Vision wiring harness was extended, by splicing in a section of 4-wire ribbon cable (actually a 4 wire segment stripped from a scrapped IDE hard drive cable.)
 To avoid accidentally splicing wires back together in reverse order rendering the cable useless, a mark was put on the same side of each Vision connector with a felt pen, to index one wire as wire 1. The individual wires of the ribbon cable were spliced in with Western Union Splices and sealed with heat-shrink tubing (don't know how to do that? – click here ) To avoid accidentally splicing wires back together in reverse order rendering the cable useless, a mark was put on the same side of each Vision connector with a felt pen, to index one wire as wire 1. The individual wires of the ribbon cable were spliced in with Western Union Splices and sealed with heat-shrink tubing (don't know how to do that? – click here )
 After test fitting the SP-8 back together, it was discovered that a couple of support struts inside the right upper receiver half needed to be carved at with a utility knife, in order to provide clear passage for the extended Vision cable. The SP-8 was then reassembled – assembling the upper receiver around the internal receiver assembly, rather than sliding the internal receiver into a finished upper receiver. After test fitting the SP-8 back together, it was discovered that a couple of support struts inside the right upper receiver half needed to be carved at with a utility knife, in order to provide clear passage for the extended Vision cable. The SP-8 was then reassembled – assembling the upper receiver around the internal receiver assembly, rather than sliding the internal receiver into a finished upper receiver.
During normal SP-8 assembly, a brass guide pin in the grip frame matches up with a hole in the front of the body breech. This ensures that the threaded hole for the front grip frame screw will be properly lined up with the hole in the grip frame. After conversion, the alignment hole is rotated out of position, so it is important to make sure the front grip frame screw is squarely lined up with the upper receiver assembly to avoid cross-threading the front grip frame screw.
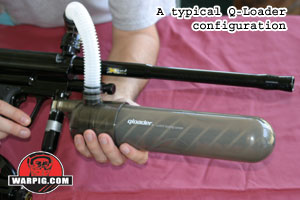 With the SP-8 conversion out of the way, the next issue was how to mount and configure a Q-Loader. The basic Q-Loader socket is designed to clamp around a marker's vertical regulator and feed paint upward and to the right. Removing the SP-8's faux magazine would allow for clamping on the regulator, but the socket would be feeding either up and to the right, or down to the left – neither direction being desirable for the left side feed. With the SP-8 conversion out of the way, the next issue was how to mount and configure a Q-Loader. The basic Q-Loader socket is designed to clamp around a marker's vertical regulator and feed paint upward and to the right. Removing the SP-8's faux magazine would allow for clamping on the regulator, but the socket would be feeding either up and to the right, or down to the left – neither direction being desirable for the left side feed.
Since the initial introduction of the Q-Loader, its manufacturer, Ancient Innovations has developed a number of new mounting methods, most of which center around its custom mounting system, or CMS. The CMS is much like the original Q-Loader socket, but instead of the fixed position mount in the back, it can accept a variety of mounting brackets, and be rotated relative to their position [Editor's note – more about these options in an upcoming article.]
One of the CMS brackets that is available in an SP-8 bundle from Ancient Innovations is designed to attach the CMS straight to the marker's feedneck. This arrangement would have maintained a low profile, and kept the Q-Pod within the shooter's silhouette when leaning out to the right – however it was not as preferred for this custom setup as an underbarrel mount.
Placing the Q-Loader under the SP-8's barrel would provide a balanced configuration and a marker outline reminiscent of a military rifle with underbarrel grenade launcher. One of the stock brackets for the CMS is a basic L-Shape with screw slots and holes that could line up and be used with the lower accessory rail screw holes on the stock SP-8 barrel shroud. This setup would mount easily, but leave the outline with the Q-Loader sticking out further than the barrel – not to mention the standard sound signature.
Using the Smart Parts Stealth Barrel and Shroud (review here) the outline looked better, the marker was quieter, but the lower accessory screw holes were too far forward to use the CMS mount bracket without the Q-Pod sticking out beneath the muzzle like a fat bayonet.
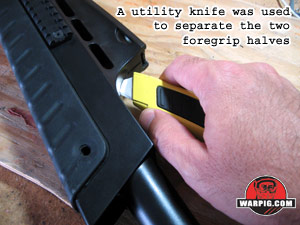 Adding new mount points to the Stealth Shroud seemed a simpler approach than fabricating a new mounting bracket for the CMS. To see where hardware could be attached inside the Stealth Shroud, its barrel was removed and a utility knife carefully run through the seam in its two halves. Rather quickly, the knife split the glue bonding them and they were separated. Adding new mount points to the Stealth Shroud seemed a simpler approach than fabricating a new mounting bracket for the CMS. To see where hardware could be attached inside the Stealth Shroud, its barrel was removed and a utility knife carefully run through the seam in its two halves. Rather quickly, the knife split the glue bonding them and they were separated.
Opening the shroud reveled its structure – six rubber baffles support the barrel when it is in the shroud, and the lower portion of the shroud could easily provide room for a pair of blind nuts.
A pair of 8-32 tee-nut style blind nuts and 8-32 screws were obtained from a local hardware store. Installation positions were determined by placing one of the shroud halves up on the receiver, and holding the CMS socket and its L-Bracket in place. The screw points were marked with a felt pen, and the two shroud halves held together in a towel lined (to prevent scratching) vise.
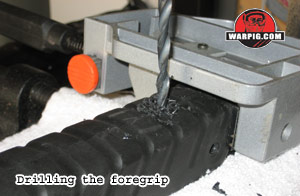 The two holes for the tee-nuts were drilled, right on the seam between the two halves. While the plastic of the shroud drilled cleanly, the rubber of its handguard did not. The rubber required hand trimming with a utility knife. The two holes for the tee-nuts were drilled, right on the seam between the two halves. While the plastic of the shroud drilled cleanly, the rubber of its handguard did not. The rubber required hand trimming with a utility knife.
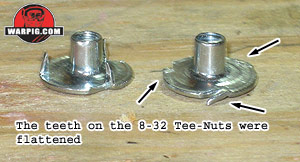 The tee-nuts were designed for use in wood or thicker plastic, and have three teeth to grip into the material. Not only did they seem a bit fierce for the thickness of the shroud, but they would also have to grip in after the shroud was sealed back together. Each of the teeth was bent flush with the flange of the tee-nut, taking it out of the way. The tee-nuts were designed for use in wood or thicker plastic, and have three teeth to grip into the material. Not only did they seem a bit fierce for the thickness of the shroud, but they would also have to grip in after the shroud was sealed back together. Each of the teeth was bent flush with the flange of the tee-nut, taking it out of the way.
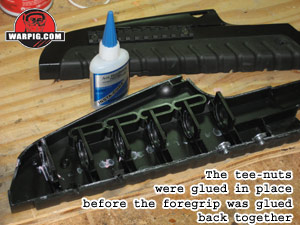 The two tee-nuts where then glued into one of the shroud halves with cyanoacrylate superglue, then the glue was applied thinly to the mating surfaces of the two halves. The halves were quickly reassembled and pressed firmly together while the glue cured. Care was taken so that excess glue would not dribble out of the seam. The two tee-nuts where then glued into one of the shroud halves with cyanoacrylate superglue, then the glue was applied thinly to the mating surfaces of the two halves. The halves were quickly reassembled and pressed firmly together while the glue cured. Care was taken so that excess glue would not dribble out of the seam.
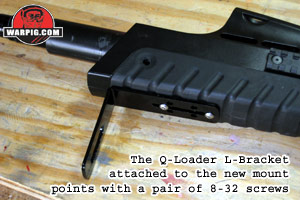
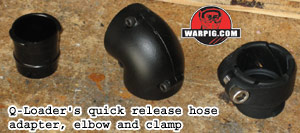
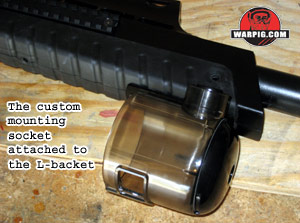 The Q-Loader L bracket was then mounted to the shroud with 8-32 screws, and the CMS mounted to the bracket. With the Stealth Shroud reinstalled on the SP-8, Q-Loader fittings – namely a section of hose and the low-profile elbow bundled in the Q-Loader. The Q-Loader L bracket was then mounted to the shroud with 8-32 screws, and the CMS mounted to the bracket. With the Stealth Shroud reinstalled on the SP-8, Q-Loader fittings – namely a section of hose and the low-profile elbow bundled in the Q-Loader.
 Testing was then done with trimming and adjustment to the Q-Loader hose to ensure that a whole number of paintballs stacked between the SP-8s breech and the CMS socket, so that a paintball would not be scissored when the Q-Pod was removed. Testing was then done with trimming and adjustment to the Q-Loader hose to ensure that a whole number of paintballs stacked between the SP-8s breech and the CMS socket, so that a paintball would not be scissored when the Q-Pod was removed.
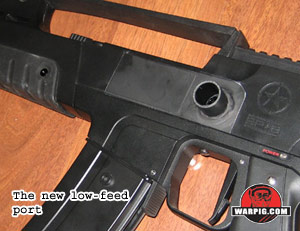
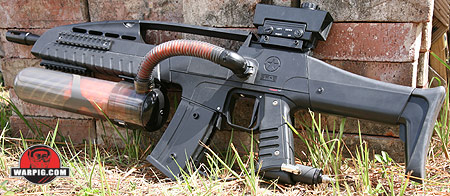
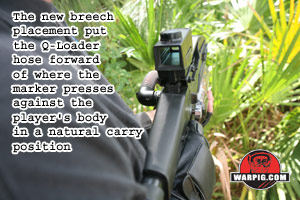
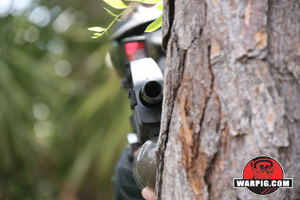 With the installation complete, the SP-8 is fed by the Q-Loader with a low profile tight silhouette, and with a balanced and aesthetic loader placement. With the installation complete, the SP-8 is fed by the Q-Loader with a low profile tight silhouette, and with a balanced and aesthetic loader placement.
|