  |
|
|
|
|
|
|
| |
|
|
|
|
|
|

What
do you think?
|
Matrix Side Feed Modification by Bill Mills One of the nice features on the Airtech Matrix is its removable breech. Not only does it mean a player can get breeches using the threads for different paintgun barrels (the standard breech features Autococker compatible threading), but also different feed methods can be employed. The standard breech is fitted with a high-rise center feed neck. Going to a low rise neck at the field can be as fast as changing the breech, which requires no tools.
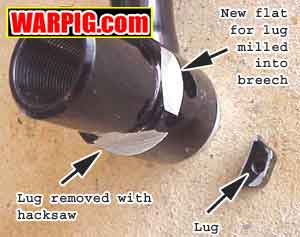
At the bottom of the breech piece, is a lug. The threaded rod which holds the rear cover plate on the Matrix screws into threads in this lug, locking the breech into place. Converting the breech to feed from the side could be done by relocating the feed neck and filling in the old top feed port, or by relocating the locking lug, and reinstalling the breech rotated 90 degrees to the left. Relocating the lug was a much simpler approach, so it is the one I took. This project was simple in many respects, but at the same time, it requires a little more skill and tooling than the average player possesses - it's a job for an airsmith. Looking over this project, if you're considering it for yourself, compare it to other projects you've done - if you think it will be easy, it probably will be - if not, any airsmith who does their own milling should be able to perform it for you for a reasonable fee. I first started by getting a spare breech. Before cutting up a perfectly good paintgun, I felt more comfortable to have a backup, not to mention the desire to be able to swap back to vertical feed later.
I'm often of the thought that a hacksaw is a pretty brutal tool for airsmithing, because it lacks precise control. However, when it came to removing the lug, it was the right tool for the job. Two hacksaw cuts, one on the back of the lug, and one underneath it removed the lug cleanly from the receiver. A little work with a file dressed its edges and straightened the rough surface left by the hacksaw. Next, I needed a new place to mount the lug, a few minutes under the mill, and I'd cut a flat in the left side of the breech, where I would mount the lug.
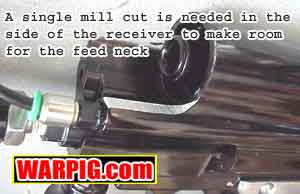
Milling the ridge off of the receiver was a quick cut in the mill, but required quite a bit more preparation. The grip frame and solenoid needed to be removed in order to lock the receiver down in the milling vise. The Matrix spool valve needed to be removed in order to protect it from metal shavings and debris. The cut itself was quick and painless. Careful cleaning was crucial - a problem I've run into before while repairing "custom" paintguns is seals cut or damaged by metal shavings left behind by a not so careful airsmith. The Matrix has no shortage of o-rings and a delicate seals inside the solenoid valve, so thorough cleaning is important.
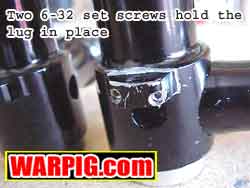
I then drilled and tapped a pair of 6-32 holes through both the lug and the breech. A pair of 3/8" 6-32 stainless steel hex head set screws firmly anchored the lug in place on the receiver.
UPDATE
|
| Copyright © 1992-2019
Corinthian Media Services. WARPIG's webmasters can be reached through our feedback form. All articles and images are copyrighted and may not be redistributed without the written permission of their original creators and Corinthian Media Services. The WARPIG paintball page is a collection of information and pointers to sources from around the internet and other locations. As such, Corinthian Media Services makes no claims to the trustworthiness or reliability of said information. The information contained in, and referenced by WARPIG, should not be used as a substitute for safety information from trained professionals in the paintball industry. |
 Personally,
I don't like the high centered hopper that comes with centerfeed placement.
Many players try to get it a little more out of the way by going to low-rise
feed necks, but these are not always as reliable at high rates of fire
when using gravity based feed hoppers. Having been impressed with
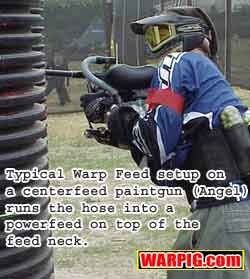
the Warp Feed on the E-Mag, I wanted to mount one on the Matrix, but on
most centerfed paintguns, this means a hose and powerfeed sticking up above
the feed neck, and into the sight picture. With the interchangeable
breech of the matrix, I figured it a natural for conversion to side feed,
and switching back to Centerfeed for my wife who doesn't care for the balance
of the Warp Feed, would be as easy as swapping back to the original breech.
Personally,
I don't like the high centered hopper that comes with centerfeed placement.
Many players try to get it a little more out of the way by going to low-rise
feed necks, but these are not always as reliable at high rates of fire
when using gravity based feed hoppers. Having been impressed with
the Warp Feed on the E-Mag, I wanted to mount one on the Matrix, but on
most centerfed paintguns, this means a hose and powerfeed sticking up above
the feed neck, and into the sight picture. With the interchangeable
breech of the matrix, I figured it a natural for conversion to side feed,
and switching back to Centerfeed for my wife who doesn't care for the balance
of the Warp Feed, would be as easy as swapping back to the original breech.
 I
had considered manufacturing a replacement lug, so the same breech could
be installed vertical or left feed, but decided against that, noting that
the original lug would interfere with a ridge on the receiver when installed
to the left, and fabricating a new lug meant more work.
I
had considered manufacturing a replacement lug, so the same breech could
be installed vertical or left feed, but decided against that, noting that
the original lug would interfere with a ridge on the receiver when installed
to the left, and fabricating a new lug meant more work.
 Without
the attachment lug, the breech could rotate when test fit in the receiver.
It was readily apparent that a ridge on the left front of the receiver
only allowed the feed neck to rotate down to about a 60 degree angle, not
all the way to 90 degrees.
Without
the attachment lug, the breech could rotate when test fit in the receiver.
It was readily apparent that a ridge on the left front of the receiver
only allowed the feed neck to rotate down to about a 60 degree angle, not
all the way to 90 degrees.
 With
the Matrix trimmed and back together, I could test fit the whole assembly.
The pressure from the lug with the threaded rod screwed into it was more
than ample to firmly hold the breech in place. Since the lug was
not attached to the breech, there was still a little play and movement
in the breech that would not go away until the lug was firmly attached
to the breech.
With
the Matrix trimmed and back together, I could test fit the whole assembly.
The pressure from the lug with the threaded rod screwed into it was more
than ample to firmly hold the breech in place. Since the lug was
not attached to the breech, there was still a little play and movement
in the breech that would not go away until the lug was firmly attached
to the breech.

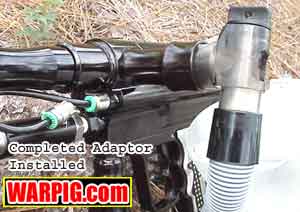 After
that, it was just a matter of assembly - locking the breech into the Matrix
with the threaded rod, and mounting a Warp feed plate between the drop
forward and grip frame. Fitting a Warp powerfeed into the feed neck
and hosing it to the Warp Feed completed the set-up.
After
that, it was just a matter of assembly - locking the breech into the Matrix
with the threaded rod, and mounting a Warp feed plate between the drop
forward and grip frame. Fitting a Warp powerfeed into the feed neck
and hosing it to the Warp Feed completed the set-up.
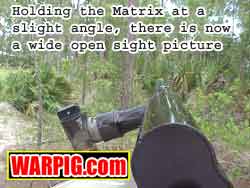 I
found it a little more comfortable to hold the Warp Fed Matrix with a slight
tilt to the right, and have been very pleased with the wide open sight
picture as well as reliable feeding the new set up provides. Changing
the feed neck to a low-rise feed neck should further "tighten" the configuration
and front cross section.
I
found it a little more comfortable to hold the Warp Fed Matrix with a slight
tilt to the right, and have been very pleased with the wide open sight
picture as well as reliable feeding the new set up provides. Changing
the feed neck to a low-rise feed neck should further "tighten" the configuration
and front cross section.
 In
the original set-up pictured above, I had cut the screw wings off of the
plastic powerfeed and wedged it into the feed neck. This is a common
set-up for Warp Feeds on centerfeed paintguns (of course then it's sticking
up off the top looking bulky). In addition to the size of "stuff"
sticking out the side, the powerfeed wedged into the feed neck has a tendency
to work its way loose. I really had to keep an eye on it through
the day. The solution came from Rob Hoover, an AirGun Designs master
tech. Rob is starting to produce a number of paintgun accessories,
including Warp feed power and control cable kits, and a Warp feed neck
for the E-Matrix. His parts are available through
In
the original set-up pictured above, I had cut the screw wings off of the
plastic powerfeed and wedged it into the feed neck. This is a common
set-up for Warp Feeds on centerfeed paintguns (of course then it's sticking
up off the top looking bulky). In addition to the size of "stuff"
sticking out the side, the powerfeed wedged into the feed neck has a tendency
to work its way loose. I really had to keep an eye on it through
the day. The solution came from Rob Hoover, an AirGun Designs master
tech. Rob is starting to produce a number of paintgun accessories,
including Warp feed power and control cable kits, and a Warp feed neck
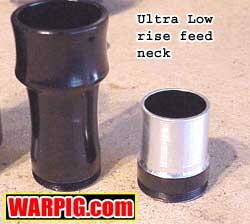
for the E-Matrix. His parts are available through  Warp
feed neck, and viola, an unmodified Warp powerfeed could clamp onto it
properly and securely. Instalation was just a matter of unscrewing
the old feed neck and screwing in the new one.
Warp
feed neck, and viola, an unmodified Warp powerfeed could clamp onto it
properly and securely. Instalation was just a matter of unscrewing
the old feed neck and screwing in the new one.