|
|
|
|
|
|
|
| |
|
|
|
|
|
|
What
do you think?
|
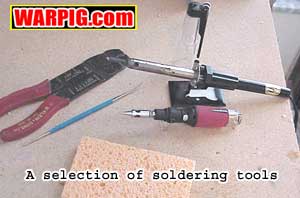
SOLDERING 101 by Bill Mills - January 2002 Forward This article was originally published in Paintball Magazine, and I am republishing it on the web as the first in a series of articles that will be geared toward teaching airsmiths about electronics. The series begins with this skill needed for repair and customization and will move on to basic electronic theory, electronic components and what they do, as well as how they are represented in schematics, and on into how to build and program custom electronics boards for paintguns with a minimum of technical knowledge. A few years back, you could tell airsmiths by their toolbox, which was packed with hex wrenches, dental picks and spare o-rings. With the increase in electronic components that has come with the paintball technology race in everything from paintguns to loaders and timers, a soldering iron is another key tool youll be seeing more and more of. Why solder? In order to get electricity to flow where you want it, it needs a good conductive path. Most metals are conductive. For convenience sake, metals are often drawn thin into wires, making them flexible to send power where its needed, just as air hoses do for pneumatics. Connecting the wires to circuitry, motors, batteries, switches, etc. is where soldering comes in. When we need to get the electricity from a wire to another component such as a battery clip, we could simply wind the wire around the metal contact of the clip. While this would work, it would have its share of problems. Depending on how much movement the wire would see, it might come unwound. Also, since only a very thin point of contact will be made between the wires round exterior and that of the battery clip, there will be resistance to the flow of electricity. When the wire is soldered to the connector, conductive metal is liquefied by heat and it flows over and fills in the gaps of the connection. Once it cools, it forms a link that is both mechanically strong, and electrically conductive. In paintball, youre likely to run into electrical problems that can be solved by a relatively simple soldering job. A number of times Ive seen players return motorized loaders for servicing when the only problem was a wire that had worked loose or broken. In the field this kind of situation is often fixed by twisting the ends of the wires together, but that is not a permanent solution. Electrically it is not sound, and mechanically its likely to break apart under the stress of use, bringing the problem back again. As a player, a basic knowledge of electricity, and soldering skill can save you down time for repair returns and maintenance bills for your own gear. As an airsmith, knowing how to solder can save you from sending some gear back to the factory, and it will definitely make your electronic repair work more professional. The Gear You can't play paintball without the right equipment, and you can't solder a good connection without it either. The minimum you need to solder a connection, and often enough in an emergency situation is a soldering iron and some solder, but a complete kit consists of a bit more:
Electronic supply stores are the easiest place to find all of these items in a single place. Radio Shack, the national retail chain, carries a wide variety of options, and a number of kits that include most of these tools at pretty reasonable prices. On some of the items you're likely to find lower prices in an electronic surplus or wholesale supply shop, which most large cities have. Starting with the iron this is the tool that is the key to it all. It is basically a heat source used to melt the solder, and heat the components, which are being connected, and usually resembles a gun or a pencil. Soldering guns typically have larger heating elements and warm up faster, but their ungainly weight limits their practicality for detailed soldering. That's not to say that they are unusable. I learned to solder with a dual-heat soldering gun. Guns are typically priced from $15 to $40, depending on features, which are typically single or dual temperature settings and a light to illuminate the workpiece. Soldering stations consist of a power supply base, a soldering pencil, stand, and a sponge. The power supply is often adjustable with high-end models including digital temperature displays. Soldering stations are usually the option used by electronics professionals, and the higher quality and features are reflected in the price, which can range from $20 on up to $70 or more.
A soldering iron stand can be done without, but it is very handy to have a place to safely set your soldering iron while it is hot. Burning down your house because you set down your soldering pencil too close to a cardboard box on your workbench is not a good way to endear yourself to your family. Spiral spring iron stands (usually included in soldering stations) have the added advantage of surrounding the hot pencil element with a cool wire coil. If you've ever accidentally brushed against a hot iron and picked up a nasty burn you can definitely appreciate this safety feature.
Soldering flux coats the metal in the connection preventing oxidation and making it more chemically friendly to bond with the solder. While flux is available in liquid and paste forms, the most convenient method of applying it is using rosin core solder, where flux is contained within the solder itself.
The same little pick you use for working pulling o-rings and seals out of your paintguns is also a very handy tool for manipulating short wires and chipping loose drops of solder from circuit boards.
The need for a safe work area seems like common sense, but common sense isnt always that common. Your work area needs to be tidy, and free from flammable items and vapors. Your work surface should be relatively flame-proof, so that it will not be damaged by accidental contact with your soldering iron. Getting Started
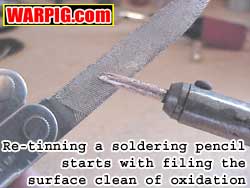
Most electronics stores sell tinning fluid or paste that will both degrease the tip, and provide some oxidation protection. If youre using an older soldering iron that shows pitting or other signs of oxidation, a file or sandpaper can be used to both clean the surface to bare metal, and reshape the tip.
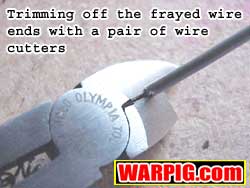
The Challenge: a frayed and broken wire
Sometimes the layout of electronics in a paintgun has wires that are just the right length. If that were the case our spliced wire would be too short, so we would splice in an extra piece of wire to add length.
With our wire together, it is time to solder. After plugging it in, turning it on, or firing it up, the soldering iron should be hot enough to melt solder within a minute or two. You can test this by touching its tip with a length of solder. If it melts, youre ready to go. Wipe off that excess drop of solder on the sponge. Rather than applying the solder to the iron, we want to first heat the wire. Putting molten solder on a cool wire will create what is called a cold solder joint. In a cold solder job, the solder may lock the wires together by having a grip around them, but it will not have bonded to the wire, so the connection is physically weaker, and it may not conduct electricity at all. [Editor's Note: After this article's initial publication, David Peter wrote in to recommend using a heatsink between on the wire between the point to be soldered and the insulation. A heatsink looks like a small pair of pliers with a spring clip, and is built to conduct heat out of items being soldered. They are available at electronic supply stores, and included in many soldering kits. David also recommends placing a drop of alcohol on the back of the heatsink to further enhance its ability to draw off heat (alcohol, with a low boiling point absorbs heat readily - use care with butane torches, as alcohol is flammable). The length of exposed, unsoldered wire should be 1 to 1.5 times the diameter of the wire insulation. David recommends this procedure to prevent solder from flowing up underneath the insulation. This leaves the wire between the insulation and the solder joint more flexible and less susceptible to damage from the vibrations and shock a paintgun is likely to undergo during use.]
How long to hold the iron is where skill and experience settle in. Different heat settings of the soldering iron, and varying thermal capacitance of different types and shapes of wire means that each soldering situation will be a bit unique. As mentioned previously, underheating will result in a cold solder joint. Overheating will result in oxidation of the exposed wires, preventing the solder from bonding well, and will also melt portions of the wires insulation as heat is transferred down the wires length. If youre new to soldering practicing on spare bits of metal and wire is a good way to hone your judgement and technique.
Holding the items to be soldered, the solder, and the soldering iron can sometimes require more hands than the average paintball player has (Im sure there are some big game players that would love a third or fourth hand to carry and shoot more paintguns at once). A small vise comes in handy to hold work items and supply stores, Radio Shack included have some nifty tools with alligator clips on articulated arms to hold work pieces during soldering.
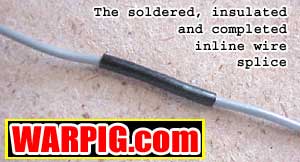
Barring heat-shrink tubing, black electrical tape will provide protection for the new connection, but especially in hot weather, the tapes adhesive looses bonding power, and oozes out at the seams where it will grab dirt and dust. Overall the heat-shrink tubing will produce results that are much more professional looking.
So there you are,
with basic soldering from start to finish. This is a skill that will come
in greater demand as electronics technology encroaches further into our
sport. If youre the do-it-yourself type person but have been intimidated
by the complexity of electropneumatic paintguns, knowing how to solder
to replace damaged components or wiring is an important step to caring
for the whole gun.
|
| Copyright © 1992-2019
Corinthian Media Services. WARPIG's webmasters can be reached through our feedback form. All articles and images are copyrighted and may not be redistributed without the written permission of their original creators and Corinthian Media Services. The WARPIG paintball page is a collection of information and pointers to sources from around the internet and other locations. As such, Corinthian Media Services makes no claims to the trustworthiness or reliability of said information. The information contained in, and referenced by WARPIG, should not be used as a substitute for safety information from trained professionals in the paintball industry. |

 Simple
soldering pencils are the basic tool at a very economical price.
According to their year 2000 catalog, Radio Shack stores stock 6 different
soldering pencils ranging from $6.99 to $9.99. Their features range
from a simple plug it in and go pencil, to one that runs on 12 volts from
an automobile cigarette lighter (OK, so you'll have to unplug the Angel
charger, but you can use it at the field), and their high end model with
dual heat settings. With a little shopping you can get even better
prices. An electronics wholesale shop in my town sells 30 watt soldering
pencils for $3.95. If you grew up in the 70s you may have had relatives
who thought wood-burning craft kits made the best Christmas present.
If youve got a wood-burning pencil sitting in a closet somewhere youll
find that it can serve double duty as a soldering pencil.
Simple
soldering pencils are the basic tool at a very economical price.
According to their year 2000 catalog, Radio Shack stores stock 6 different
soldering pencils ranging from $6.99 to $9.99. Their features range
from a simple plug it in and go pencil, to one that runs on 12 volts from
an automobile cigarette lighter (OK, so you'll have to unplug the Angel
charger, but you can use it at the field), and their high end model with
dual heat settings. With a little shopping you can get even better
prices. An electronics wholesale shop in my town sells 30 watt soldering
pencils for $3.95. If you grew up in the 70s you may have had relatives
who thought wood-burning craft kits made the best Christmas present.
If youve got a wood-burning pencil sitting in a closet somewhere youll
find that it can serve double duty as a soldering pencil.
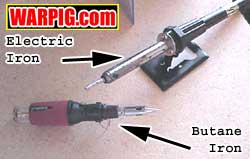
 An
alternative approach to electrical power is butane. For around $20,
you can get a butane powered soldering iron with interchangeable tips that
also allow it to serve as a torch. These nifty tools are fueled by the
same butane cans used to recharge refillable butane lighters. One
charge gives it enough fuel for about a half hour's operation. The
major advantage to these is that there is no electricity required, a very
handy feature if you're hoping to make a repair at the field. If
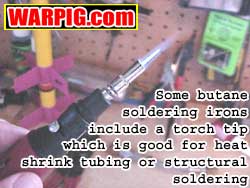
you are going to tackle any larger soldering jobs, like soldering a feed
port on a brass bodied gun (solder will not bind to aluminum) you can switch
to the torch tip to warm up the larger area of metal. The torch can
also provide heat for shrinking heat shrink insulation, so long is it is
held below the insulation and far enough away that it does not burn or
melt the plastic.
An
alternative approach to electrical power is butane. For around $20,
you can get a butane powered soldering iron with interchangeable tips that
also allow it to serve as a torch. These nifty tools are fueled by the
same butane cans used to recharge refillable butane lighters. One
charge gives it enough fuel for about a half hour's operation. The
major advantage to these is that there is no electricity required, a very
handy feature if you're hoping to make a repair at the field. If
you are going to tackle any larger soldering jobs, like soldering a feed
port on a brass bodied gun (solder will not bind to aluminum) you can switch
to the torch tip to warm up the larger area of metal. The torch can
also provide heat for shrinking heat shrink insulation, so long is it is
held below the insulation and far enough away that it does not burn or
melt the plastic.
 A
soldering sponge is another item that is not essential, but makes good
quality soldering easier. The sponge must be made of cellulose, to
resist the iron's heat, and should be slightly dampened. They are
included in many soldering kits, or can be found at just about any grocery
store just make sure to get one that is made of cellulose, and not any
form of plastic that would melt or catch fire.
A
soldering sponge is another item that is not essential, but makes good
quality soldering easier. The sponge must be made of cellulose, to
resist the iron's heat, and should be slightly dampened. They are
included in many soldering kits, or can be found at just about any grocery
store just make sure to get one that is made of cellulose, and not any
form of plastic that would melt or catch fire.
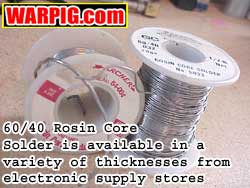 Electronic
soldering should be done with solder that is an alloy of 60 percent tin
and 40 percent lead, usually referred to as 60/40 solder, electronics solder,
or radio solder. While other blends are available for applications
like pipe soldering, 60/40 is usually what you will run into in electronics
shops, most often it will have a rosin flux core. Expect to spend
two to three dollars for a spool of solder.
Electronic
soldering should be done with solder that is an alloy of 60 percent tin
and 40 percent lead, usually referred to as 60/40 solder, electronics solder,
or radio solder. While other blends are available for applications
like pipe soldering, 60/40 is usually what you will run into in electronics
shops, most often it will have a rosin flux core. Expect to spend
two to three dollars for a spool of solder.
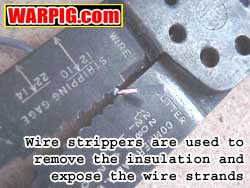 Both
wire cutters and strippers, or a tool that combines the two are needed
to trim wires and remove their outer plastic insulation to reveal the wire
inside that is to be soldered. Some wire strippers are complex and
clamp one end of the wire, cut the insulation and strip it off, while others
simply cut it, and can be used to pull the unwanted insulation away.
Many wire cutters, and even pliers with internal wire cutters feature a
grove that can be used to strip insulation away. Ive often found
that in the smaller wires used in electronics work, just my thumbnail is
enough to strip the insulation away from the end of a piece of wire without
needing a tool. If working with electronic components to be soldered
onto a circuit board, small cutters and needle nose pliers are a must have.
Tools like these are where shopping can really make a difference. I recently
broke (some of these smaller tools are delicate) a pare of cutters that
cost $10 at my local hardware store, and found a replacement at a local
electronics wholesaler for only $3.
Both
wire cutters and strippers, or a tool that combines the two are needed
to trim wires and remove their outer plastic insulation to reveal the wire
inside that is to be soldered. Some wire strippers are complex and
clamp one end of the wire, cut the insulation and strip it off, while others
simply cut it, and can be used to pull the unwanted insulation away.
Many wire cutters, and even pliers with internal wire cutters feature a
grove that can be used to strip insulation away. Ive often found
that in the smaller wires used in electronics work, just my thumbnail is
enough to strip the insulation away from the end of a piece of wire without
needing a tool. If working with electronic components to be soldered
onto a circuit board, small cutters and needle nose pliers are a must have.
Tools like these are where shopping can really make a difference. I recently
broke (some of these smaller tools are delicate) a pare of cutters that
cost $10 at my local hardware store, and found a replacement at a local
electronics wholesaler for only $3.
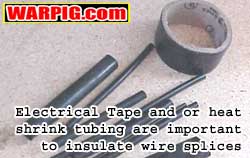 Electrical
tape and heat-shrink tubing are a must. Even if youre making a quick
twisted wire connection without soldering, electrical tape will provide
both protection, and insulation to prevent short-circuits. Covering
wire splices and connectors with heat-shrink tubing can be the difference
between a finished job that looks homebrewed or professional. Heat-shrink
tubing is just what its name implies. Its is a plastic tubing that shrinks
when warmed by hot air, allowing it to tighten around the connection it
is covering. Heat-shrink tubing is available in a variety of colors, including
clear, and a selection of sizes can be purchased for two or three dollars.
Electrical
tape and heat-shrink tubing are a must. Even if youre making a quick
twisted wire connection without soldering, electrical tape will provide
both protection, and insulation to prevent short-circuits. Covering
wire splices and connectors with heat-shrink tubing can be the difference
between a finished job that looks homebrewed or professional. Heat-shrink
tubing is just what its name implies. Its is a plastic tubing that shrinks
when warmed by hot air, allowing it to tighten around the connection it
is covering. Heat-shrink tubing is available in a variety of colors, including
clear, and a selection of sizes can be purchased for two or three dollars.
 If
you havent used your soldering iron before, you will need to start by
tinning it. Keeping the tip tinned means to keep a thin coating of
solder on it. If the tip is not tinned, it is more prone to damage by oxidation
when hot, and will not last as long. Solder will also not flow well
over an oxidized tip. You need to start by making sure the tip is
clean and free of oils.
If
you havent used your soldering iron before, you will need to start by
tinning it. Keeping the tip tinned means to keep a thin coating of
solder on it. If the tip is not tinned, it is more prone to damage by oxidation
when hot, and will not last as long. Solder will also not flow well
over an oxidized tip. You need to start by making sure the tip is
clean and free of oils.
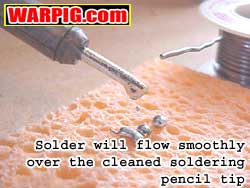 Eventually,
the soldering tip will be worn down greatly, and can be replaced with a
spare, which are also readily available in electronic supply stores.
Then fire it up, and melt some solder until it flows smoothly over the
tip. A quick wipe across the dampened sponge will remove excess solder
and leave just a thin protective film.
Eventually,
the soldering tip will be worn down greatly, and can be replaced with a
spare, which are also readily available in electronic supply stores.
Then fire it up, and melt some solder until it flows smoothly over the
tip. A quick wipe across the dampened sponge will remove excess solder
and leave just a thin protective film.
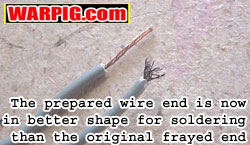
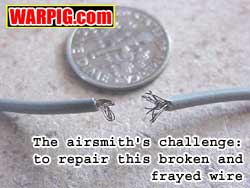 For
our example soldering job, well fix a broken wire. If the ends of
the wire are dirty or corroded, its probably best to trim them off.
Solder wont adhere well to the corrosion, and dirt and oils will provide
electrical resistance. If we were connecting to a post, or lead on
an electrical component like a switch, a light sanding, or running over
the surface with a fine file will clean and roughen the surface for a better
connection. In the case of our wire, well just trim off the dirty
part, and use the wire strippers to remove about a half an inch of insulation.
The freshly exposed copper will have been well protected from oxidation
by the plastic insulation.
For
our example soldering job, well fix a broken wire. If the ends of
the wire are dirty or corroded, its probably best to trim them off.
Solder wont adhere well to the corrosion, and dirt and oils will provide
electrical resistance. If we were connecting to a post, or lead on
an electrical component like a switch, a light sanding, or running over
the surface with a fine file will clean and roughen the surface for a better
connection. In the case of our wire, well just trim off the dirty
part, and use the wire strippers to remove about a half an inch of insulation.
The freshly exposed copper will have been well protected from oxidation
by the plastic insulation.
 If
you don't own wire strippers, it's a good idea to be careful with your
choice of words when you go to purchase one. "Hey honey, I'm going
out to get a stripper," might cause undue strife in your home.
If
you don't own wire strippers, it's a good idea to be careful with your
choice of words when you go to purchase one. "Hey honey, I'm going
out to get a stripper," might cause undue strife in your home.
 Splicing
the two ends of the wire together is easily done by overlapping the exposed
ends and then twisting the strands together. This type of connection
is called a Western Union splice, after its use in telegraph lines.
We could have simply laid the wires side by side and twisted the ends together,
but that would stress the wires more when pulled, possibly leading to future
breakage.
Splicing
the two ends of the wire together is easily done by overlapping the exposed
ends and then twisting the strands together. This type of connection
is called a Western Union splice, after its use in telegraph lines.
We could have simply laid the wires side by side and twisted the ends together,
but that would stress the wires more when pulled, possibly leading to future
breakage.  If
we are going to use heat shrink tubing, we need to slide a length of it
over one of the wires before we join them. This is an easy step to
forget, but once the wires are joined there wont be a free end to slide
through the tube. If I had a nickel for every time I re-soldered
something because I forgot to slide an insulator on the wire first, Id
own my own 747 by now.
If
we are going to use heat shrink tubing, we need to slide a length of it
over one of the wires before we join them. This is an easy step to
forget, but once the wires are joined there wont be a free end to slide
through the tube. If I had a nickel for every time I re-soldered
something because I forgot to slide an insulator on the wire first, Id
own my own 747 by now.
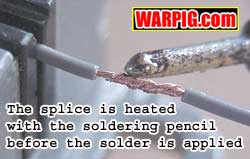 We
can heat the wire by holding the tip of the soldering iron to it.
Most soldering tips have a oblique conical end. Rather than touching
just the point of the tip, the iron should be held at an angle so that
the edge of that front cone makes full contact with the connection being
heated. The more contact surface there is, the faster heat will transfer.
Heating the wires too slowly will give time for the heat to transfer down
the wires, damaging the insulation, and possible other connections or components.
This is important as some semiconductors like transistors, diodes and integrated
circuits can be destroyed by excessive heat. If soldering to the
lead on something that is heat sensitive, it is a good idea to grip the
lead with a heatsink (also available at electronics store) or needlenosed
pliers between the solder joint and the component. This metal contact
will help draw away excess heat and protect the component.
We
can heat the wire by holding the tip of the soldering iron to it.
Most soldering tips have a oblique conical end. Rather than touching
just the point of the tip, the iron should be held at an angle so that
the edge of that front cone makes full contact with the connection being
heated. The more contact surface there is, the faster heat will transfer.
Heating the wires too slowly will give time for the heat to transfer down
the wires, damaging the insulation, and possible other connections or components.
This is important as some semiconductors like transistors, diodes and integrated
circuits can be destroyed by excessive heat. If soldering to the
lead on something that is heat sensitive, it is a good idea to grip the
lead with a heatsink (also available at electronics store) or needlenosed
pliers between the solder joint and the component. This metal contact
will help draw away excess heat and protect the component.
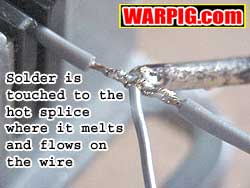 I
usually hold the iron to the joint for a couple of seconds, then touch
the tip of a length of solder to the joint. When the joint is hot
enough to melt the solder, Ill let a small amount flow over the exposed
metal. This way Im only heating it just enough, and can see when
the proper temperature is reached.
I
usually hold the iron to the joint for a couple of seconds, then touch
the tip of a length of solder to the joint. When the joint is hot
enough to melt the solder, Ill let a small amount flow over the exposed
metal. This way Im only heating it just enough, and can see when
the proper temperature is reached.
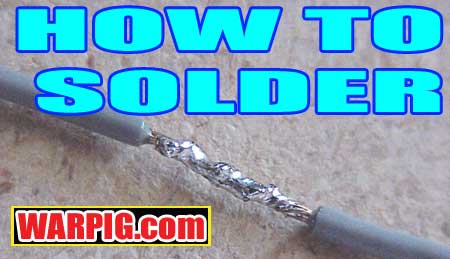
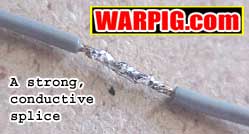 On
a properly soldered connection there is just enough solder to thinly coat
the involved metal and join it together with a smooth, shiny surface.
Grey, discolored, or lumpy solder indicates grease, dirt, oxidation or
inadequate heat problems. Again, this is where practice makes perfect.
Working with scraps first will give you the experience to do a good job
when it counts.
On
a properly soldered connection there is just enough solder to thinly coat
the involved metal and join it together with a smooth, shiny surface.
Grey, discolored, or lumpy solder indicates grease, dirt, oxidation or
inadequate heat problems. Again, this is where practice makes perfect.
Working with scraps first will give you the experience to do a good job
when it counts.
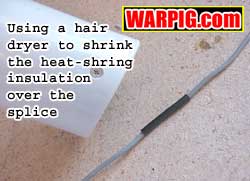 With
the joint soldered, its time to seal it up to protect it from the elements
and insulate it to prevent short-circuiting. If youve gone the heat-shrink
route, simply slide the tubing up over the connection and shrink it down.
If you have a heat gun in your tool chest, its the ideal tool to use for
the job. A good high wattage hair dryer wont put out quite as much
heat as a heat gun, but can get the job done over a slightly longer period
of time. If you dont have either, waving a lighter or candle under
the tubing will do this trick. This is another feat that needs practice
too, as getting the tubing too close to the flame will burn it, and you
need to recognize when it is fully contracted heating further will flare
out the ends.
With
the joint soldered, its time to seal it up to protect it from the elements
and insulate it to prevent short-circuiting. If youve gone the heat-shrink
route, simply slide the tubing up over the connection and shrink it down.
If you have a heat gun in your tool chest, its the ideal tool to use for
the job. A good high wattage hair dryer wont put out quite as much
heat as a heat gun, but can get the job done over a slightly longer period
of time. If you dont have either, waving a lighter or candle under
the tubing will do this trick. This is another feat that needs practice
too, as getting the tubing too close to the flame will burn it, and you
need to recognize when it is fully contracted heating further will flare
out the ends.