  |
|
|
|
|
|
|
| |
|
|
|
|
|
|
What
do you think?
|

Smart Parts' Ion How it Works By Bill Mills - Photos by Dawn Mills - Aug 2005 Overview - How It Works - Disassembly - Testing - Raw Test Data
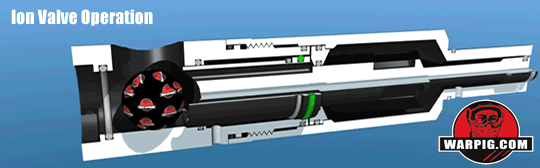
Inside the fire chamber lies the heart of the Ion, its bolt which serves as a spool valve core. In general principle the Ion functions similarly to a Shocker SFT or Matrix. In addition to chambering a ball and closing the breech, the bolt controls the flow of gas from the fire chamber (also known as an accumulator in pneumatics lingo) to the breech.
The Ion design is simpler than the Shocker or Matrix however, in that the bolt is driven forward by the pressure of the gas in the fire chamber. Instead of using control gas through a 4 way solenoid valve to move the bolt back and forth, the Ion uses a simpler control valve to either push the bolt back to the open position with gas, or to vent and allow the gas in the fire chamber to blow the bolt forward.
Installation of a 9-volt battery (included) is simple. Two Phillips head screws release one of the wraparound grip panels, and provide access to the battery storage area in the grip. The battery snaps into its battery clip and is ready to go. At the field, air a hopper and paint are all that is needed to get the Ion rolling. Pressing, and momentarily holding the power button in the Ions grip turns it on, with the Vision mode active. For review a Crossfire 4500 psi high output (800 psi output) compressed air system was used. Basic velocity adjustment can be achieved by changing the settings of the vertical regulator. An adjustable wrench can get a solid grip on the flats on the bottom of the regulator. It is important while adjusting, to keep an eye on the pressure gauge to make sure that 200 psi is not exceeded during set-up.
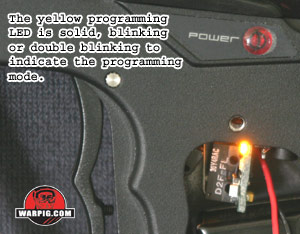
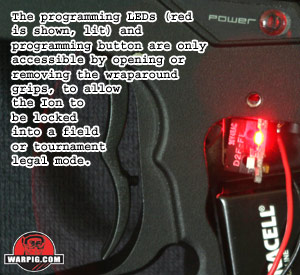
Located on the opposite side of the circuit board from the programming button are a pair of surface mounted light emitting diodes (LEDs.) These two diodes blink in various sequences to indicate programming status, while the power button is used to change the selected setting. In all there are three settings which can be adjusted on the Ions circuit board. Programming begins by turning on the Ion, and pressing the programming button. Each time the programming button is pressed, the setting being adjusted will be changed, and the pattern of blinking LEDs will indicate the selected setting. Each setting may be adjusted either up or down, depending on the pattern with which the LEDs are blinking.
When the programming button is first pressed, the yellow LED will light solidly, pressing the power button at this point will increase the dwell time, or the amount of time that the circuit applies power to the solenoid valve to fire a paintball. Pressing the programming button again will cause the Ion circuit board to hold the red LED on solidly. Then each press on the power button will decrease the dwell time. When a setting reaches either the bottom or top of the range over which it can be adjusted, the red LED will flash momentarily. The velocity at which a paintball is fired will depend on the fit of the ball to the barrel, the pressure of the gas (vertical regulator setting) and the dwell time for the valve. A setting of 52 is standard for the Ion dwell time, but players looking to tweak maximum gas efficiency may want to spend some time at the chrono optimizing their pressure and dwell settings. For the most part it is common practice to keep a dwell of 52 and adjust velocity with the vertical regulator.
European readers will note that the version of the Ion sold in the UK does not include full-auto or burst firing modes. UK Ions can be readily identified by their green power button LED. Because the programming button cannot be accessed on field without tools, the Ion can be field legal under most field and tournament rules which limit paintguns to semi-auto only. While an experienced referee will be able to recognize the rebound mode simply by test firing, the most certain way to verify if an Ion is in rebound or semi-auto mode is to open the grip and change the setting. |
| Copyright © 1992-2019
Corinthian Media Services. WARPIG's webmasters can be reached through our feedback form. All articles and images are copyrighted and may not be redistributed without the written permission of their original creators and Corinthian Media Services. The WARPIG paintball page is a collection of information and pointers to sources from around the internet and other locations. As such, Corinthian Media Services makes no claims to the trustworthiness or reliability of said information. The information contained in, and referenced by WARPIG, should not be used as a substitute for safety information from trained professionals in the paintball industry. |

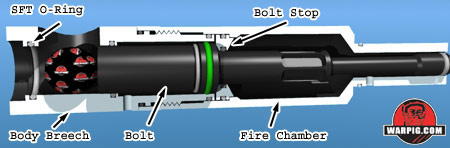
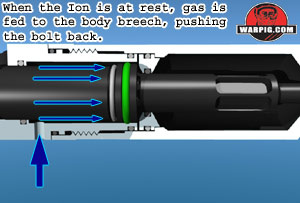 The
simpler design means a less complicated bolt and housing, as well as less
complex gas paths. Gas travels into the ASA from the vertical regulator,
and through a hose to the solenoid valve. Two hoses run from the
solenoid valve. One directs gas to the rear of the fire chamber,
to charge and fire the ball, while the other runs from the valve to the
body breech. When the solenoid is at rest air fed to the body breech
holds the bolt back.
The
simpler design means a less complicated bolt and housing, as well as less
complex gas paths. Gas travels into the ASA from the vertical regulator,
and through a hose to the solenoid valve. Two hoses run from the
solenoid valve. One directs gas to the rear of the fire chamber,
to charge and fire the ball, while the other runs from the valve to the
body breech. When the solenoid is at rest air fed to the body breech
holds the bolt back.
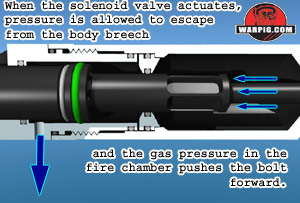 When
the Ion is fired and the solenoid is energized the solenoid valve stops
feeding gas pressure to the body breech, and lets its air empty out while
the air in the fire chamber blows the bolt forward.
When
the Ion is fired and the solenoid is energized the solenoid valve stops
feeding gas pressure to the body breech, and lets its air empty out while
the air in the fire chamber blows the bolt forward.
 This
layout opens up the Ion to a number of possible modifications. A
quick exhaust valve is a common upgrade item chosen by Ion owners.
A QEV replaces the hose fitting on the body breech. When the pressure
fed to the QEV is relieved by the solenoid valve, the QEV opens and allows
the body breech to vent directly rather than through the hose and solenoid
valve. By reducing the restrictions for air to get out of the body
breech, the QEV allows the bolt to close with more force and speed at the
same operating pressures.
This
layout opens up the Ion to a number of possible modifications. A
quick exhaust valve is a common upgrade item chosen by Ion owners.
A QEV replaces the hose fitting on the body breech. When the pressure
fed to the QEV is relieved by the solenoid valve, the QEV opens and allows
the body breech to vent directly rather than through the hose and solenoid
valve. By reducing the restrictions for air to get out of the body
breech, the QEV allows the bolt to close with more force and speed at the
same operating pressures.
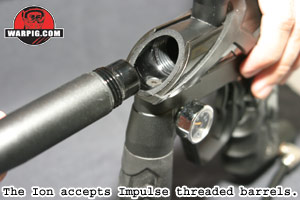 Setting
up the Ion was simple, as it is ready to go out of the box. Included
is a set of hex wrenches for maintenance, as a twelve inch Ion barrel.
The stock barrel is tapered to a narrower walled center, features porting
in the last few inches, Impulse threads, and a powder coated exterior to
math the Ion.
Setting
up the Ion was simple, as it is ready to go out of the box. Included
is a set of hex wrenches for maintenance, as a twelve inch Ion barrel.
The stock barrel is tapered to a narrower walled center, features porting
in the last few inches, Impulse threads, and a powder coated exterior to
math the Ion.
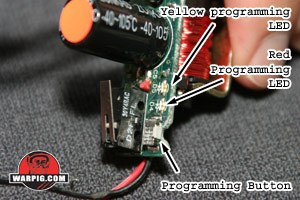 Pressing
the power button while the Ion is on toggles the Vision system on and off.
This allows the gun to fire without the break beam infrared eyes in case
they are blocked by debris. Making other mode changes requires opening
the wraparound grip. With the grip open, a small grey programming
button becomes accessible.
Pressing
the power button while the Ion is on toggles the Vision system on and off.
This allows the gun to fire without the break beam infrared eyes in case
they are blocked by debris. Making other mode changes requires opening
the wraparound grip. With the grip open, a small grey programming
button becomes accessible.
 Pressing
the power button will make the change indicated by the LEDs. There
is no indication of what the present settings are, so select a specific
setting one needs to set a value down to zero or up to the maximum, then
count ed to the desired amount.
Pressing
the power button will make the change indicated by the LEDs. There
is no indication of what the present settings are, so select a specific
setting one needs to set a value down to zero or up to the maximum, then
count ed to the desired amount.
 Similarly,
the rate of fire setting, which is the amount of time the Ion waits after
firing before the next shot can be fired, is set with a blinking red LED
indicating that the ROF can be increased, or the blinking yellow indicating
that it can be decreased. Due to the reliability of the Vision system,
many players will opt to set the rate of fire setting to its minimum, in
order to maximize their rate of fire. The purpose of this setting
is three-fold. First it ensures that the Ion is not fired faster
than its loader can feed paint. The second is to make sure that the
fire chamber has enough time to completely fill before firing, in order
to minimize shoot-down under rapid fire. The third reason is that
some paintball leagues, including the NXL, PSP, and CFOA have placed a
limit on the maximum rate of fire a player can use on the field.
The ROF adjustment can be used to comply with these rules. It is
important to note that while the ROF settings name implies it adjusts
rate of fire, that it is a combination of the ROF setting and the dwell
time setting that will determine the actual rate of fire limit.
Similarly,
the rate of fire setting, which is the amount of time the Ion waits after
firing before the next shot can be fired, is set with a blinking red LED
indicating that the ROF can be increased, or the blinking yellow indicating
that it can be decreased. Due to the reliability of the Vision system,
many players will opt to set the rate of fire setting to its minimum, in
order to maximize their rate of fire. The purpose of this setting
is three-fold. First it ensures that the Ion is not fired faster
than its loader can feed paint. The second is to make sure that the
fire chamber has enough time to completely fill before firing, in order
to minimize shoot-down under rapid fire. The third reason is that
some paintball leagues, including the NXL, PSP, and CFOA have placed a
limit on the maximum rate of fire a player can use on the field.
The ROF adjustment can be used to comply with these rules. It is
important to note that while the ROF settings name implies it adjusts
rate of fire, that it is a combination of the ROF setting and the dwell
time setting that will determine the actual rate of fire limit.
 The
final setting which can be adjusted is the firing mode. The double-blinking
of the yellow LED indicates that the firing mode value can be increased,
while double blinking of the red LED indicates that it is being decreased.
The first mode (0) is basic semi-automatic. The second (1) is rebound,
similar to the rebound modes in the Shocker SFT and Nerve, it adds shots
in addition to those generated by trigger pulls after the first few pulls
of a string. The third mode (mode 2) is a three shot burst.
Pulling and holding the trigger results in three shots being fired.
The fourth and final mode (3) is full automatic. Pressing and holding
the trigger causes the Ion to fire repeatedly until the trigger is released.
While the Ion can fire at up to 17 balls per second in semi-auto and rebound
modes, the burst and full automatic modes are capped at 10 balls per second.
The
final setting which can be adjusted is the firing mode. The double-blinking
of the yellow LED indicates that the firing mode value can be increased,
while double blinking of the red LED indicates that it is being decreased.
The first mode (0) is basic semi-automatic. The second (1) is rebound,
similar to the rebound modes in the Shocker SFT and Nerve, it adds shots
in addition to those generated by trigger pulls after the first few pulls
of a string. The third mode (mode 2) is a three shot burst.
Pulling and holding the trigger results in three shots being fired.
The fourth and final mode (3) is full automatic. Pressing and holding
the trigger causes the Ion to fire repeatedly until the trigger is released.
While the Ion can fire at up to 17 balls per second in semi-auto and rebound
modes, the burst and full automatic modes are capped at 10 balls per second.