US Army Alpha Black Tactical
by Bill Mills - Photos by Dawn Mills - March 2008
Features HowItWorks Disassembly Adjustment Testing Data
DISASSEMBLY
Before any cleaning or disassembly, the Alpha Black must of course be completely unloaded and degassed. It should also be un-cocked so that the mainspring is under minimal pressure. Eye protection should be worn, and maintenance should be performed in a clean environment, as some internal parts are under pressure and can sometimes spring out unexpectedly.
Basic disassembly of the Alpha Black for cleaning starts by simply removing the feedneck to use a pull-through squeegee to clean the barrel. This is achieved by pressing down on the feedneck release latch, folding the feedneck down, then pulling it back so that its hinge pins clear their mounts in the receiver.
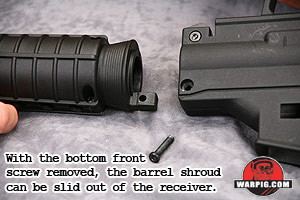 The barrel is removed by unscrewing and pulling it forward, though it would be best not to store the marker in this condition, as it would leave the barrel shroud unsupported and might damage its mount tab.
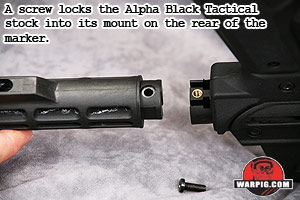 The adjustable stock is removed from its mount by unscrewing the stock screw, and then simply sliding the stock's center shaft up and off of the stock mount. It should be noted that unlike the corresponding part on a Tippmann 98 Custom, the rear plug of the Alpha Black Basic is ready to accept a stock, so the marker does not need to be taken apart in order to add a stock. This is important as the Alpha Black markers are designed for newer players for whom complete marker disassembly may be a challenging task.
 The Alpha Black's wraparound rubber grip is actually split in two halves, which means it does not need to be removed in order to separate the receiver clamshell for maintenance or cleaning.
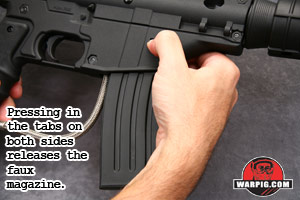
Removing the faux magazine gets it out of the way.
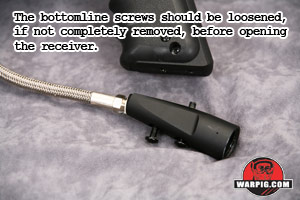 While the bottom-line adapter does not need to be removed, its two screws do at least need to be loosened with a 1/8-inch hex wrench. It is however, preferable to remove these screws completely, and let the bottom-line hang free on its braided steel hose.
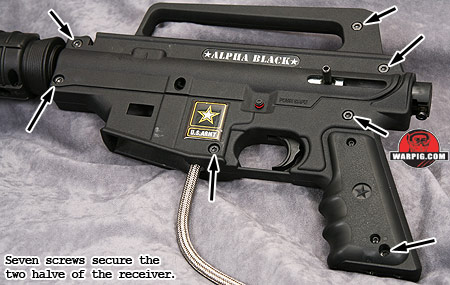
Seven screws hold the two clamshell halves of the receiver together. These can be removed from the left receiver half with a 1/8-inch hex wrench. Care should be taken to ensure that the corresponding nuts do not fall out of the right receiver half and become lost. Unless they have been removed before, the nuts will usually stay in place.
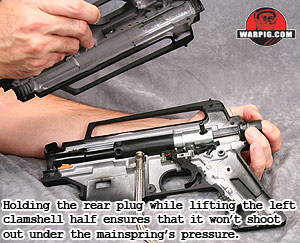 With the screws removed, the left receiver half can be lifted up off the right half. Care should be taken to be sure that the feedneck latch spring does not pop out, and that the rear plug stays with the right body half.
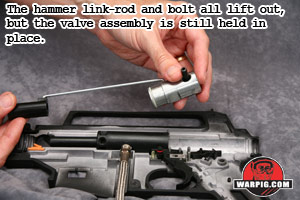
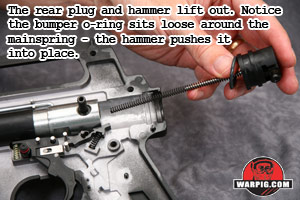 With the left receiver half set aside, the rear plug can be lifted out, relieving pressure from the mainspring. This allows the hammer and bolt to be lifted out. It should be noted that the Alpha Black receiver and rear plug has both the upper pins, and the space to accommodate the ACT link rod from Tippmann's Anti Chop Technology system (click here for more info) making it a viable upgrade for the Alpha Black.
 With everything open, a basic cleaning and lubrication can be performed, by simply wiping down any paint residue or dirt with a damp cloth, and using a pick to clean small crevices. Paintgun oil can be used to lubricate o-rings that rub against other components, such as that on the front of the hammer.
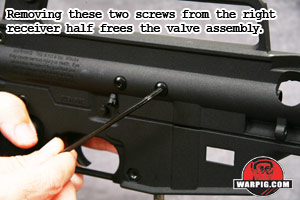 If necessary, the valve assembly can be removed from the right receiver half by removing its two mount screws from the right side of the body.
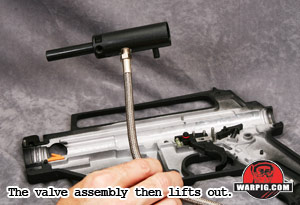 Normal cleaning and maintenance will rarely need to go further than this, and due to complexity most players avoid disassembling the CVX valve assembly itself. Between Tippmann's well renowned warranty support, and the relative ease of simply replacing the entire valve assembly, some airsmiths avoid valve disassembly altogether.
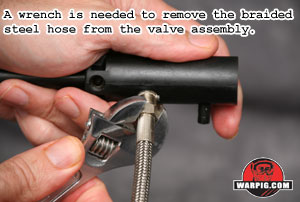 For those intrepid enough to venture further, the steel braided hose must be removed from the valve assembly in order to take it apart. This is achieved with an adjustable or open end wrench.
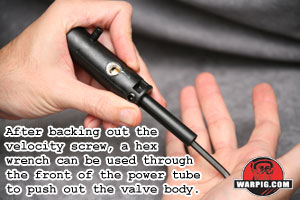 After backing the velocity control screw out of the way, a hex-wrench can be slid into the front of the power tube and used to push the valve body out.
Continue with Disassembly.