  |
|
|
|
|
|
|
| |
|
|
|
|
|
|
What
do you think?
|
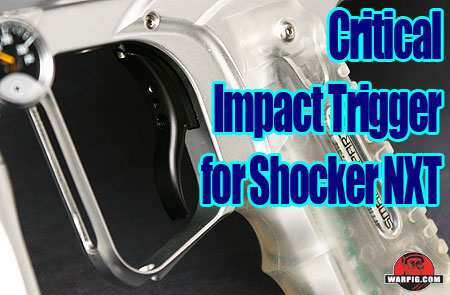
Impact Trigger for Shocker NXT By Bill Mills - Photos by Dawn Mills - March 2007
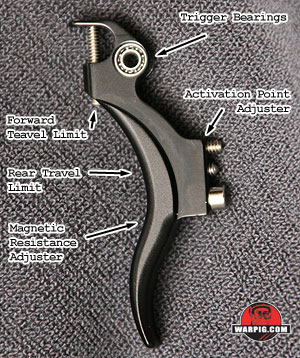
The Impact Trigger for the NXT is a smooth S-Shape, like the marker's stock trigger the Impact has front and center adjustments for tension, rear travel limit and activation point, but keeping to the Impact trigger style, the forward travel limit adjustment is in the top, forward of the trigger's imported bearing assembly.
With some careful maneuvering, the Impact Trigger can be installed in the Shocker NXT without even removing the grip frame. Using a 1/16-inch hex wrench, the trigger pivot pin is unscrewed from the left side of the grip frame.
The NXT trigger return spring should come out with the trigger. Before installing the Impact Trigger, the grip frame needs a magnet for the trigger's magnet to push against. A small rare-earth magnet and tube of fast bonding cyanoacrylate cement are included with the Impact Trigger.
To avoid confusion, the return magnet was allowed to stick to trigger magnet, and its exposed side marked with a felt-tipped marker. The marked side would need to face the trigger when installed.
Before the trigger could be jockeyed into position, it was necessary to back out its forward travel limit screw (top adjustment screw) to gain clearance. Once this was done, the trigger slid easily into place.
Once installed, the forward (at top of trigger) and rear travel limits (middle adjustment on trigger facce) of the trigger were adjusted witth a 0.050-inch hex wrench.
Able to be installed rather quickly, the Critical Impact Trigger's recurved shape gave a new feel to the Shocker NXT's trigger pull, yet maintained the four-point external adjustment found in the stock trigger, and switched from spring return to a magnetic return system.
|
| Copyright © 1992-2019
Corinthian Media Services. WARPIG's webmasters can be reached through our feedback form. All articles and images are copyrighted and may not be redistributed without the written permission of their original creators and Corinthian Media Services. The WARPIG paintball page is a collection of information and pointers to sources from around the internet and other locations. As such, Corinthian Media Services makes no claims to the trustworthiness or reliability of said information. The information contained in, and referenced by WARPIG, should not be used as a substitute for safety information from trained professionals in the paintball industry. |
 In addition to being a dealer of tournament oriented paintball supplies, Critical Paintball produces their own line of accessories and upgrades, including the Impact Trigger for the Shocker NXT.
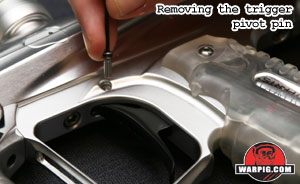 While the Shocker NXT's predecessor utilized a magnetic trigger return system, the NXT design is spring based. The Impact trigger give the feel of a magnetic trigger return to the Shocker NXT.
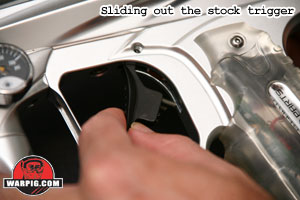 Installing the Impact Trigger for review was a fairly straightforward process, but a few of points would be easier for those with little Shocker tech experience if Critical included a short instruction sheet or provided installation instructions online.
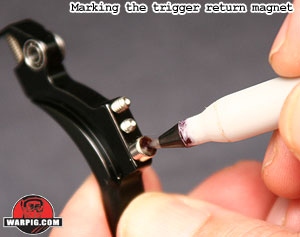 This should free the stock trigger to be removed by tilting it forward, then pulling downward and forward. Some maneuvering may be required, and depending on how the trigger settings are adjusted, it might be necessary to back out one or more of the trigger adjustment screws to gain the necessary clearance.
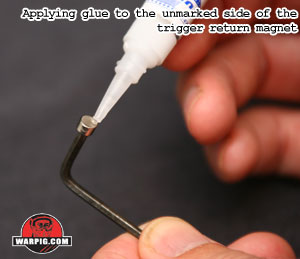 It is important when installing the trigger return magnet that it be facing the correct direction – otherwise it will pull the trigger back, and hold it back, rather than push the trigger forward when pressure is released.
 The return magnet was then stuck to the end of a hex wrench, on its marked side, and the un-marked side was given a drop of cyanoacrylate glue. The magnet was then installed in the very bottom of the trigger control block inside the NXT grip frame. Simply pressing it in place for a few seconds was enough time to allow the glue to set, then the hex wrench could be removed, as the glue had a stronger grip than the magnet.
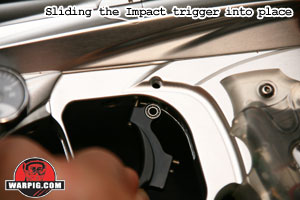 While aligning the trigger's bearing, the trigger pivot pin was slid into place, and secured by screwing it in with a hex wrench. The trigger pivot pin has an o-ring at its neck, which provides friction to lock it in place. That o-ring should not be lubricated, as that would defeat its purpose.
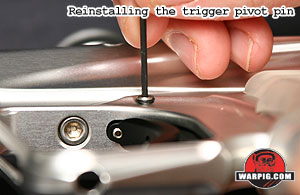 This left the trigger activation point, or how far into the trigger stroke the NXT fires, to be adjusted. This too was achieved with a 0.050-inch hex wrench. This adjuster screw lay in the top hole on the trigger face. It is important to note that the combined adjustment of the rear travel limit and the trigger activation point must be set so that the trigger comes to a hard stop against the rear travel limit screw when pulled all the way back. If the activation point screw is turned in so far that the trigger comes to a stop from it pressing against the trigger switch, then the trigger switch could sustain damage from hard pulls on the trigger – and for those who aren't adept at soldering, that means buying a whole new circuit board.
 The final adjustment on the Impact Trigger, is the trigger return strength. This adjustment was made in the bottom hole on the trigger face with a 3/32-inch hex wrench. Turning this screw moves the position of the trigger's magnet closer to, or further from the return magnet glued into the grip frame.