  |
|
|
|
|
|
|
| |
|
|
|
|
|
|
AO Level 10 Info including install video AGD
Master Tech Kayle Malcom Introduces Level 10 on PigTV
What
do you think?
|

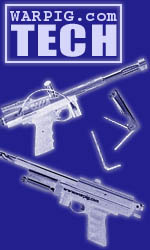
Airgun Designs Level 10 By Bill Mills November 2002 In the mid 1990s, serious tournament paintball players mainly shot one of two paintguns, an Automag or an Autococker. In the years since, the choices have widened significantly. In 1996, Airgun Designs introduced the Automag RT, a compressed air version of their venerable mag, which was the first paintgun to incorporate a reactive trigger it boasted an astounding 26 shot per second capability without velocity drop off, a feat equaled by few, if any other paintguns today (for WARPIG's report of the RT debut CLICK HERE). The Automag RT was quickly saddled with a reputation as a paint blender, for two reasons. The first is that an early batch of RT bodies with a high rise powerfeed arrangement was produced incorrectly, and the paintballs did not roll through it properly, leading to breakage and feeding problems. While AGD remedied this, and then canceled the high rise powerfeed body (though it remained available in Europe where there had been no bad batch to sour consumers) a reputation for ball chopping was earned. The second, and more valid reason for the reputation was the force with which the bolt moves forward in an Automag. In the Autococker, and a number of other paintguns, the bolt is moved by a ram or other means, powered by low pressure gas (note this is not the same as the gas propelling the paintgun, and has nothing to do with low pressure paintguns or modification). This means that they can move the bolt with very little force, and if a paintball is partially fed when the player tries to fire, the bolt may only pinch it, but not push so hard against it as to break it. With the Automag design, the force behind the closing bolt was not adjustable.
Enter Level 10, Airgun Designs anti-pinch solution that doesnt need an eye, electronics, or a new feed system to operate. The entire issue of how much force is behind an Automags bolt is based on how it works. The Automag is a blow forward paintgun design. The bolt contains a piston in its center. The piston slides inside of a tube extending from the valve in the back of the gun, called a power tube. Air pressure pushes the bolt forward until the piston gets past the seal (the power tube o-ring) inside the power tube, and the gas rushes around it, through the bolt, and pushes the paintball out of the barrel. Once the gas pressure is released, the mainspring pushes the bolt back in place. The no brainer approach to lessen bolt force would be to lower the gas pressure as Autococker users do when they adjust their low pressure regulator. The problem with that, is the same gas that moves the bolt is the gas that propels the ball. Lowering the pressure on an Automag would decrease velocity. Airgun Designs took a trickier approach. By making the piston inside the bolt more complex, they have given the Level 10 bolt system a two step action. When the bolt first starts moving, gas is allowed to escape through a pinhole in the side of the hollowed out piston. For the first two thirds or so of the bolts forward movement, the pinhole vent relieves pressure into the power tube, greatly limiting the amount of force behind the bolt as it moves forward. The result is the bolt is so gentle that in public and video demonstrations, Airgun Designs president Tom Kaye has placed his tongue in the breech of an E-Mag to show that it is not hurt by the bolt. If the bolt is stopped, it looses momentum, and the mainspring returns it to the cocked position with little more than a light Sssk! sound. If the bolt is not stopped by an obstruction, a ridge on its central piston seals against a narrowing neck at the end of the Power tube, providing positive, full pressure to complete the closure of the bolt, and then the Automag fires as before.
Additionally, the Superbolt II returns to a feature found on original Automag bolts which was discontinued in the mid 1990s a foamy. In the end of the bolt is a soft rubbery foam insert that is basically a pillow, so that the material striking the ball is softer and more resilient than steel. For review, I chose to install the Level 10 kit in my Automag RT. I did not install it in my E-Mag, because I had been using a Warp Feed on the E-Mag, which does not suffer any paint chopping issues. My RT on the otherhand (my wife and I have long argued over whos RT it is, unfortunately Tom Kaye decreed one day that it was hers) is the veteran of 3 World Cup tournaments, and while ball breakage was rare when I used my original Revolution loader, it was a constant problem every game with a 2000 pre-X-Board Revy. It was easy to outshoot the hopper, and that resulted in chopping paint. Installing and adjusting the Level 10 kit in the RT took about a half hour in total. The included instruction sheet is somewhat brief, but it was augmented by copious instructions and feedback at Automags.org, as well as a video clip walking through the installation procedure.
Installing the Level 10 kit started with the backing washer, a white Delrin washer. Its important that it sits flat at the bottom of the power tube, and I made sure it was seated with a wooden dowel. The Level 10 power tube o-ring is smaller than the original, and the washer serves the all important task of making sure the o-ring doesnt have room to fall back into the valve.
Once the leak check was performed, the gun was degassed, and disassembled again. Two of the metal shims from the Level 10 kit were added between the carrier and the new power tube spacer. These shims, which look like thin metal washers, affect the point at which air starts venting in the bolts forward stroke. This is critical to getting the bolt to reset if it does stop on a pinched ball. While AGD includes extra shims for proper adjustment, most users have reported two as being optimal, so thats what was used for review.
After dry firing about 50 or 60 shots testing the setup, a leak occurred in the power tube o-ring. Likely this was due to wear on the o-ring, breaking in to the shape of the carrier and surfaces. Wiggling the bolt changed the sound of the leak, indicating that this was indeed where the leak was occurring. Changing the carrier to the next smallest size alleviated the problem, so it was time to take the RT out to the field. For field testing, the RT was used at Righteous Paintball in Jupiter Farms, Florida (righteouspaintball.com). The hot and humid conditions meant paint that didnt always want to load. The RT was topped with a Ricochet 2K loader, and the Level 10 performed as advertised. Even turning off the hopper to cause ball jams and feeding problems, the RT would fire, make an Ssssssk! sound if a ball was pinched behind the bolt, and then fire on the next trigger pull once the ball had settled into place. Subjectively, I found that the RT had a new feel. Likely due to the lighter weight bolt, there was less perceived recoil with each shot, meaning it was a steadier platform to provide tighter shot groupings.
For current mag users, the benefits of Level 10 do come with a price. Setting up the Level 10 upgrade will take some time and experimentation, something that was not previously required in setting up an Automag. For tinkerers who love nothing more than adjusting Autococker timing, and fiddling with dip switches on electro guns, this is a plus. For the player that wants to pick up their mag and go play without having to worry, they may want to find the tinkerer on their team to do the Level 10 installation for them.
|
| Copyright © 1992-2019
Corinthian Media Services. WARPIG's webmasters can be reached through our feedback form. All articles and images are copyrighted and may not be redistributed without the written permission of their original creators and Corinthian Media Services. The WARPIG paintball page is a collection of information and pointers to sources from around the internet and other locations. As such, Corinthian Media Services makes no claims to the trustworthiness or reliability of said information. The information contained in, and referenced by WARPIG, should not be used as a substitute for safety information from trained professionals in the paintball industry. |
 The
Automag RT was followed up with the E-Mag, essentially the same paintgun,
with an electronic solenoid to actuate the sear, and a magnetic field effect
trigger system to tell the electronics to fire. The E-Mag, as technologically
sound as it was, still faced the Automag paint breakage reputation.
AGD released the Warp Feed system, which forced paint into the breech instead
of relying on gravity. This alone took care of ball breakage issues,
because it meant that paintballs were all the way in the breech, and not
halfway, before the player pulled the trigger. The problem there
was that the Warp Feed is rather unconventional, and thus shunned by many
in paintball. This still left the high end models of the Automag
line able to out-shoot agitating loaders, and break paint when they did.
The
Automag RT was followed up with the E-Mag, essentially the same paintgun,
with an electronic solenoid to actuate the sear, and a magnetic field effect
trigger system to tell the electronics to fire. The E-Mag, as technologically
sound as it was, still faced the Automag paint breakage reputation.
AGD released the Warp Feed system, which forced paint into the breech instead
of relying on gravity. This alone took care of ball breakage issues,
because it meant that paintballs were all the way in the breech, and not
halfway, before the player pulled the trigger. The problem there
was that the Warp Feed is rather unconventional, and thus shunned by many
in paintball. This still left the high end models of the Automag
line able to out-shoot agitating loaders, and break paint when they did.
 In
addition to the anti-chop properties, the Level 10 bolt is also referred
to as the Superbolt II. I had my first look at the Superbolt at
the NPPL Chicago Open in 2001. Airgun Designs techs were in short
supply at that tournament, and on a break between videotaping games, I
did some gun tech work in the AGD booth, something Ive found to be an
excellent way to increase my airsmithing knowledge and skills. Matt
Davis of the Jax Warriors handed me his E-Mag, which had a problem.
The wire ball detent had broken, and damaged his prototype Superbolt.
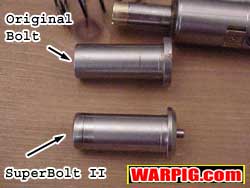
The original Superbolt consisted of a standard Automag bolt cut down substantially
to reduce weight and covered in a Delrin sleeve. The nubbin had cut
into the Delrin. A bit of cutting and sanding, a new nubbin and Matt
was back in the game. Test firing I felt the purpose of the new bolt.
By being lighter weight, there was less movement of mass in the paintgun,
and it gave the feel of less recoil when firing, making tight shot groups
easier to achieve. The Superbolt moved from prototype to beta testing
with members of Automags.org, AGDs online user community. Unfortunately,
it came up lacking. It suffered problems of the Delrin sleeves cracking,
and never made it into full production. The Level 10 Superbolt II,
however echoes the original Superbolts design intent. Because its
interior has been hollowed to allow for the new piston system it is substantially
lighter than the original Automag bolt while still retaining the necessary
strength and durability of all stainless steel construction.
In
addition to the anti-chop properties, the Level 10 bolt is also referred
to as the Superbolt II. I had my first look at the Superbolt at
the NPPL Chicago Open in 2001. Airgun Designs techs were in short
supply at that tournament, and on a break between videotaping games, I
did some gun tech work in the AGD booth, something Ive found to be an
excellent way to increase my airsmithing knowledge and skills. Matt
Davis of the Jax Warriors handed me his E-Mag, which had a problem.
The wire ball detent had broken, and damaged his prototype Superbolt.
The original Superbolt consisted of a standard Automag bolt cut down substantially
to reduce weight and covered in a Delrin sleeve. The nubbin had cut
into the Delrin. A bit of cutting and sanding, a new nubbin and Matt
was back in the game. Test firing I felt the purpose of the new bolt.
By being lighter weight, there was less movement of mass in the paintgun,
and it gave the feel of less recoil when firing, making tight shot groups
easier to achieve. The Superbolt moved from prototype to beta testing
with members of Automags.org, AGDs online user community. Unfortunately,
it came up lacking. It suffered problems of the Delrin sleeves cracking,
and never made it into full production. The Level 10 Superbolt II,
however echoes the original Superbolts design intent. Because its
interior has been hollowed to allow for the new piston system it is substantially
lighter than the original Automag bolt while still retaining the necessary
strength and durability of all stainless steel construction.
 Installation
begins with degassing the mag, and pulling the AIR valve assembly out
from the back. Since this was an RT, no gas hoses needed to be removed,
just the banjo bolt that locks the valve in place and delivers air.
The mainspring comes off of the bolt, and the bolt slides off of the power
tube. A quarter (a Canadian coin is the preferred tool of AGDs Master
Techs) fits into the brass power tube tip to unscrew it. A pick is
then used to pull out the power tube spacer and o-ring. In the mid
1990s, aftermarket power tube spacer kits were a common product Automag
owners would purchase to tune their triggers, by testing the fit of power
tube spacers of different lengths. Fitting a spacer of the wrong
length is also a sure way to cause performance problems. My wife
in fact has a necklace made of aftermarket powertube spacers that AGD Master
techs have pulled out of guns because they caused problems. They
are nicely anodized in a series of colors, but not good for the mag when
the wrong size is selected, hence the power tube spacer that I pulled out
was the original stock part that worked just fine.
Installation
begins with degassing the mag, and pulling the AIR valve assembly out
from the back. Since this was an RT, no gas hoses needed to be removed,
just the banjo bolt that locks the valve in place and delivers air.
The mainspring comes off of the bolt, and the bolt slides off of the power
tube. A quarter (a Canadian coin is the preferred tool of AGDs Master
Techs) fits into the brass power tube tip to unscrew it. A pick is
then used to pull out the power tube spacer and o-ring. In the mid
1990s, aftermarket power tube spacer kits were a common product Automag
owners would purchase to tune their triggers, by testing the fit of power
tube spacers of different lengths. Fitting a spacer of the wrong
length is also a sure way to cause performance problems. My wife
in fact has a necklace made of aftermarket powertube spacers that AGD Master
techs have pulled out of guns because they caused problems. They
are nicely anodized in a series of colors, but not good for the mag when
the wrong size is selected, hence the power tube spacer that I pulled out
was the original stock part that worked just fine.
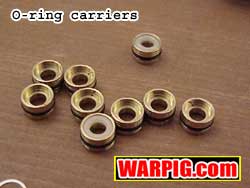
 Next
comes the o-ring and its carrier. With the Level 10 bolts smaller
piston, it needs a smaller o-ring, and that o-ring is held in the power
tube in a brass carrier. The fit of the o-ring to the piston is critical.
If it is too loose, it will leak, if it is too tight, the friction will
be enough to keep the bolt from closing under the newer, lighter closing
force (it really is that light). To allow for variance in o-ring
manufacturing, AGD includes variety of carriers with the kit, each with
a slightly different sized space for the o-ring. The size of each
carrier is coded with a series of bands and dots on its side. Finding
the right carrier is simply a matter of test fitting.
Next
comes the o-ring and its carrier. With the Level 10 bolts smaller
piston, it needs a smaller o-ring, and that o-ring is held in the power
tube in a brass carrier. The fit of the o-ring to the piston is critical.
If it is too loose, it will leak, if it is too tight, the friction will
be enough to keep the bolt from closing under the newer, lighter closing
force (it really is that light). To allow for variance in o-ring
manufacturing, AGD includes variety of carriers with the kit, each with
a slightly different sized space for the o-ring. The size of each
carrier is coded with a series of bands and dots on its side. Finding
the right carrier is simply a matter of test fitting.
 The
o-ring, lightly lubricated with Autolube paintgun oil went into the middle
sized carrier, and was fitted onto the bolts piston. The fit was
a little loose, but the next size smaller carrier did the trick, a solid
fit that was snug but not tight. The same dowel was used to seat
the o-ring carrier, o-ring first into the power tube. This took a
little maneuvering, as when it first appeared to be seated, it was not.
A little wiggling on the dowel was needed to align it properly to fully
seat.
The
o-ring, lightly lubricated with Autolube paintgun oil went into the middle
sized carrier, and was fitted onto the bolts piston. The fit was
a little loose, but the next size smaller carrier did the trick, a solid
fit that was snug but not tight. The same dowel was used to seat
the o-ring carrier, o-ring first into the power tube. This took a
little maneuvering, as when it first appeared to be seated, it was not.
A little wiggling on the dowel was needed to align it properly to fully
seat.
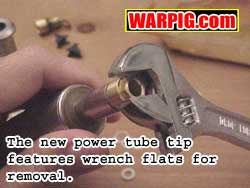 The
next step was to install the new power tube tip. Because the tip
is made of brass, a relatively soft metal, screwing into stainless steel,
it is important not to over-tighten it. While it has wrench flats,
it was tightened only by hand, leaving the wrench to unscrew it later.
The gun was reassembled with the stock spring and Superbolt II, then gassed
up to check for leaks. There were none. If there had been,
the next step would be to use the wooden dowel to wiggle the bolt, and
see if the tone of the leak changed. This would indicate that the
o-ring carrier was too large, and allowing a leak.
The
next step was to install the new power tube tip. Because the tip
is made of brass, a relatively soft metal, screwing into stainless steel,
it is important not to over-tighten it. While it has wrench flats,
it was tightened only by hand, leaving the wrench to unscrew it later.
The gun was reassembled with the stock spring and Superbolt II, then gassed
up to check for leaks. There were none. If there had been,
the next step would be to use the wooden dowel to wiggle the bolt, and
see if the tone of the leak changed. This would indicate that the
o-ring carrier was too large, and allowing a leak.
 Now
it was time to select the mainspring to be used. The Level 10 kit
ships with three mainsprings, which combined with the stock spring give
a total of four choices. The stronger the spring, the less force
the bolt will have in forward motion, because much of that energy is going
into compressing the spring. However, if the spring is too strong,
the bolt will not be able to go all the way forward and fire. It
is, in essence a balancing act. After a couple of test firings the
second to the longest bolt proved to fire every time, but still provide
a bolt pressure that was light enough to stop on a finger without bruising
(dont try that in a standard mag!).
Now
it was time to select the mainspring to be used. The Level 10 kit
ships with three mainsprings, which combined with the stock spring give
a total of four choices. The stronger the spring, the less force
the bolt will have in forward motion, because much of that energy is going
into compressing the spring. However, if the spring is too strong,
the bolt will not be able to go all the way forward and fire. It
is, in essence a balancing act. After a couple of test firings the
second to the longest bolt proved to fire every time, but still provide
a bolt pressure that was light enough to stop on a finger without bruising
(dont try that in a standard mag!).
 Once
set up, Level 10 is basically adjustment free, but it is important to make
sure the bolts piston stays oiled, through the day, as a tight o-ring
carrier, can bind without proper lubrication, keeping the bolt from closing
and the mag from firing. Theoretically operating temperature can
come into play as well, so it is a good idea for Level 10 users to take
a small tool kit, including the spare o-ring carriers with them to the
field. Additionally, with the return of a foamy bolt, the player
needs to check on the bolt occasionally to make sure that the foamy has
not broken free and been fired out of the paintgun. Replacing the
foamy is quick and easy with super-glue, a process that most mag shooters
had forgotten ever since AGD switched to foamiless bolts.
Once
set up, Level 10 is basically adjustment free, but it is important to make
sure the bolts piston stays oiled, through the day, as a tight o-ring
carrier, can bind without proper lubrication, keeping the bolt from closing
and the mag from firing. Theoretically operating temperature can
come into play as well, so it is a good idea for Level 10 users to take
a small tool kit, including the spare o-ring carriers with them to the
field. Additionally, with the return of a foamy bolt, the player
needs to check on the bolt occasionally to make sure that the foamy has
not broken free and been fired out of the paintgun. Replacing the
foamy is quick and easy with super-glue, a process that most mag shooters
had forgotten ever since AGD switched to foamiless bolts.
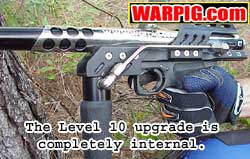
 Performance
wise, the Level 10 upgrade, is a decisive answer to the claims of Automag
critics that the guns are paint blenders, and may well breathe new life
into the Automag line amongst tournament paintball players, owing to the
Automags low profile design fast valve system, and the E-Mags exclusive
reactive electronic trigger.
Performance
wise, the Level 10 upgrade, is a decisive answer to the claims of Automag
critics that the guns are paint blenders, and may well breathe new life
into the Automag line amongst tournament paintball players, owing to the
Automags low profile design fast valve system, and the E-Mags exclusive
reactive electronic trigger.