  |
|
|
|
|
|
|
| |
|
|
|
|
|
|
What
do you think?
|
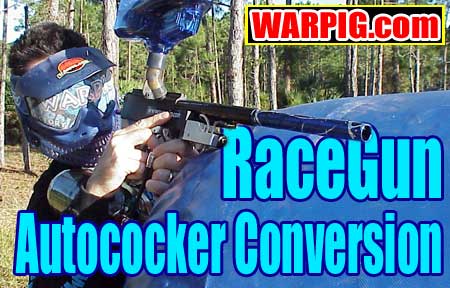
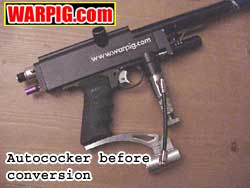
RaceGun Autococker Conversion by Bill Mills In the mid 1980s, Bud Orr at Worr Games Products started making the WGP Sniper paintgun, machining an aluminum body and pump mechanism to house PGP valving as a high end paintgun. In the early 1990s, the WGP Sniper evolved into the Autococker when the front pump assembly was replaced by a pneumatics package that did the job of cocking the paintgun. The Autococker quickly became a favorite among tournament paintball teams because it was the first mass produced semi auto paintgun to provide consistency from shot to shot. Even today, when the tournament and high end recreational paintball scenes are full of modern, super-engineered, high performance electronically controlled paintguns, many players still opt for the tried and true performance of the mechanical and pneumatic systems of the Autococker.
In the Autococker, the pumping stroke isnt handled by energy from the user, but by pneumatics. The front pneumatics block draws gas from behind the main valve. A low pressure regulator delivers a supply of gas to a 4 way (or 3 way, or 5 way, depending on whos terminology you prefer) valve. At rest, the valve supplies the recocking ram pressure, keeping it forward. As the player pulls the trigger back, it first trips the sear releasing the hammer to fire the Autococker, but then the user must continue pulling it further back. As the trigger continues rearward it pulls a link called the timing rod, and actuates the 4 way valve. The cocking ram now receives air to its opposite side, and via the pump arm, pushes the bolt and hammer back, cocking the hammer and dropping the next paintball, just as when a player pulls back on a pump. When the trigger is released, the 4 way resets, driving the ram forward, closing the bolt - ready for the next shot.
Enter the electronic conversions The Autococker has been incredibly popular when it comes to availability of aftermarket parts, and it only seems fitting that after the electronics revolution that hit paintball in the late 1990s, that electronic conversions would become available for the Autococker. The first of these conversions was the Force 5 from Sandridge, using electronics and solenoid valves to replace the mechanical timing and 4 way valve. In 2001 came the Uprising from Centerflag, in which a single solenoid released the sear and tripped the stock 4-way, relying on mechanical timing. These conversions added light electronic triggers to the Autococker, making it easier for players to shoot faster, something that has become a focus in the evolution of paintball. Both of these solutions were factory installs, as their manufacturers considered them too complex to release for store airsmiths or end users to install them. Then, out of Denmark came RaceGun, a bolt-on electronic conversion. It first began appearing in the US supported by Professional Paintball, as an option on their Freeflow custom Autocockers. Without a major advertising push, most of growth of the RaceGun in the US has been through word of mouth and the Internet, as more dealers have begun stocking the kit. The RaceGun conversion replaces the Autocockers 4 way valve with a compact solenoid valve that operates on an electrical signal. Its sear works in a whole new, and ingenious way. On many other electronic paintguns (especially the blowback conversions like the electro Spyders and Piranhas), designers have simply used a solenoid to trip the sear. In that set-up, the electrical coil does all the work normally done by the person pulling the trigger. The amount of force needed means a fair amount of drain on the batteries. The RaceGun conversion takes a different approach to releasing the Autocockers hammer. Instead of a standard sear, it has a new sear designed to literally fall away from the hammer when released, rather than push tighter on the hammer under the mainspring pressure. The sear is held up, locking the hammer back, by a small prop with a roller bearing. A very compact solenoid simply trips the roller bearing out of the way allowing the sear to swing down, releasing the hammer.
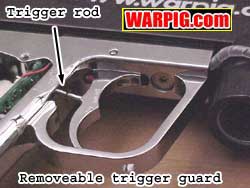
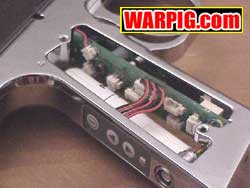
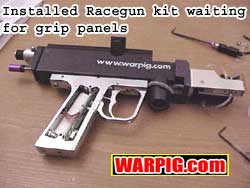
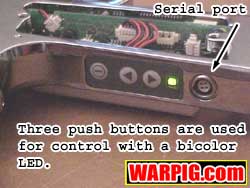
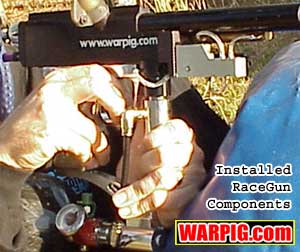
The mechanical set up of the solenoid valve and solenoid sear are needed for the mechanical function of the RaceGun frame, the electronic circuitry is what controls them. Packed inside a traditionally shaped .45 style grip frame is a slender microprocessor controlled circuit board and nickel metal hydride battery pack. The choice of NiMH is more expensive than traditional NiCD rechargeable batteries, but offers more storage capacity and immunity from the memory effect that can cause NiCDs to take only a partial charge. The RaceGun trigger is linked to the leaf switch on the circuit board with a small metal rod that rests between the two. [Editor's note: The design of the circuit board originally included a dome switch, but the style was changed to the more dirable leaf switch] On the rear surface of the grip is a three-button control surface, bi-color LED and interface port that is used both for programming and charging the internal battery. The grip frame is available in both chrome finish and black ano. Close inspection of the trigger guard reveals the fact that it is held in place by a pair of screws even though its fit is close enough that it at first appears to be part of the frame. The two-piece construction means that the guard can be replaced for a single-trigger set-up without needing to replace the entire grip frame. While the single trigger and guard were not available at the time of this review, they were expected real soon now from RaceGun in Denmark. Installing and properly timing the RaceGun set-up turned out to be easier than expected. Included with the conversion kit is a well illustrated eight page manual with large clear photographs showing every step of the process. More detailed information is available in online documentation at the manufacturers web site. The Autococker chosen to host the RaceGun computer grip for review was a WGP right feed Autococker manufactured in the early 1990s. While a number of components had been swapped to aftermarket parts, and some modifications (wire nubbin, sear lug depth adjustment holes, lightened back block) the paintgun was generally stock in configuration. The first installation step was to remove the stock aluminum sliding trigger grip frame. Following its removal, the pneumatics hoses were disconnected, and the aftermarket 4 way valve removed from the front block. The solenoid 5 way valve (RaceGun uses the term 5 way as the exhaust ports have fittings) is then mounted in place of the 4 way. Since the solenoid valve is not the same shape as an Autococker 4 way a mount bracket is installed to hold it. The bracket is made of stamped sheet metal bent to shape, and it is held in place by a hollow nut that screws into the front block in place of the 4 way.
It should be noted, for players looking for a stylish paintgun, that the raw sheet metal of the mount is rather lacking, appearance wise. As a more expensive option, an all new front block can be used, which has a mount for the valve milled into it, allowing the entire unit to be anodized to match the paintgun. Hose fittings must be attached to the 5 way valve. Again there was a discrepancy between the manual and the parts supplied in the kit. The manual showed small, right angle hose barbs, while straight barbs were included in the kit. For the two ports on top of the valve which connect to the ram, the straight barbs definitely fit the bill. However, for the supply port on the bottom of the valve a right angle fitting would have allowed the hosing between the low-pressure regulator (in this case a Palmers Mini-Rock) to be tidier.
It was important to make sure while mounting the grip frame, that the wires leading from the front of the grip frame did not get pinched. They run through a channel in the top of the grip frame and are wedged in place with small pieces of hose. Since they go around the Autocockers ASA connector, a short piece of wire loom is included. Wrapping this around the short stretch of exposed wire gives it adequate protection from abrasion. The plug on the end of these two wires goes into the 5 way valve, a feat that is next to impossible to achieve while the valve is mounted. Loosening the mount allowed the valve to be jockeyed into a position where the wire could be plugged in, and then the valve secured back in place. Not covered in the manual was the installation of the trigger return spring, it sat as a leftover part. Not included in the kit were grip panels, as those are left up to the end user. The RaceGun, unlike its competitors, uses standard Colt model 1911 compatible grip panels. For the review, an Extreme Rage Omega Series Timer Grip was used, its clear color giving a muted peek at the electronics inside.
After the requisite four hours, the battery was fully charged, and the green LED stayed lit while the red half flashed, and then flashed only green. According to RaceGun a single charge should be good for somewhere between 20,000 and 40,000 shots, which for most people will be more than ample for a day of paintball. The Cocker was set up with a Shocktech drop forward and ASA macrolined to an Air America Unireg with LAPCO adjuster cap in the vertical ASA (yes, this Autococker was built well before vertical regs were stock equipment.)
When the Racegun trigger is pulled an LED lights on the board (visible through the clear grips,) and another on the solenoid 5 way valve indicates when it is on. These serve as important diagnostic tools if something should go wrong. The fact that no timing adjustments needed to be made in order for the RaceGun frame to be installed made the electronic conversion a faster and easier process than even switching from the stock trigger frame to a swing trigger or 45 frame. In a very short amount of time the Autococker leapt into the realm of electronic markers. Whats more, due to the digital timing, it now became impossible to short-stroke the gun.
In both cases, the RIP software connects to the RaceGun frame with a serial cable (A USB hotlink cable or cradle will not work with Palm version, it must be a serial hotsync cable.) The cable plugs into the PC or PDA, and into the same-4 pin socket on the grip as the charging adapter. A couple of small plastic covers are included to protect the RaceGun serial port from dirt and dust while on the field. The PC version, owing to the higher resolution and capabilities of the Windows operating system is a bit easier to use, and more flexible in the features it controls, but both RIP versions allow timing adjustments, which is the key to optimizing rate of fire and performance. Once the frame is cabled to the computer, the Get command reads the grips settings into the computer. Changes can then be made, and the put button used to load them into the grip. Different settings can be saved using the library function on the PC version of RIP.
Sniper mode is designed with the scenario game sniper in mind. It puts greater separation between the firing and re-cocking, at the users discretion. When the trigger is pulled back, the Autococker will fire, but it will not re-cock until the trigger is released. Thus a sniper dug into the brush in their ghillie suit can fire a single shot, and wait to make the noise of re-cocking until after the coast is clear. Because the RaceGun can not fire during the re-cock stroke, it is difficult to achieve a high rate of fire in Sniper mode. Full Automatic is the last available mode, and as the name implies, begins firing when the trigger is pulled, and fires repeatedly until the trigger is released. The RaceGun does not feature a physical lock-out for full auto mode, but since it can only be activated or deactivated the use of RIP software, the RaceGun in Semi-auto is locked into that mode in order to be field and tournament legal.
The first value is the Shot time. This is how long the sear solenoid is actuated. Setting this value too short means the cocker wont release the hammer, setting it too long will use unneeded energy, and thus deliver less shots per battery charge. On the test gun, a value of 2 milliseconds was too low, and 3 ms consistently released the hammer without fail. 4ms was used, to add a margin of error.
The next timing value is the Open time. In order to set it properly, the load time must first be set to its minimum value of 1ms. The Open time is the length of time the RaceGun must actuate the 5 way solenoid valve in order to open the bolt and re-cock the hammer. When this value is too low, the bolt and cocking block will not come back far enough to cock the hammer. When this value is too high, the bolt will be held open longer than needed, decreasing the maximum rate of fire. Since the speed at which the bolt opens is affected by cocking pressure, adjustments to the low pressure regulator may require that the RIP software be used to re-time the RaceGun. On the test gun, the bolt was found to open and cock the hammer reliably with a setting of 25ms. It was then set to 26ms to allow for a margin of error. The next value is Load. Load is the amount of time the RaceGun holds the bolt open to allow for a ball to fall into the breech. Technically, it is really the combination of Load and Open that the RaceGun is concerned with, as that is how long the 5 way solenoid valve is held open. By splitting them into two separate values however, the end user can easily see the amount of time needed to open the bolt, and then adjust the load time and close time accordingly. Since a HALO B loader was to be used in testing, Josh recommended 15ms as a safe value. The best way to optimize this value and thus maximize rate of fire is to test with the particular paint and loader combination to be used at the field, adjusting the timing with a PDA in order to find the minimum setting that will load paint with every shot.
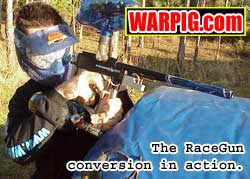
The RIP software also reads the level of charge on the RaceGun battery pack, the total shot counter, and two resetable shot counters, as well as settings for a game timer. Although there is not an LCD or LED display for a counter to show time, the RaceGun board is able to beep in alarm at the end of the set time interval or with a 60 second warning before the end. The Options menu was available in the PC version of RIP reviewed, but not yet in the Palm version. It allows settings to be made for the Anti-Chop eye, both activating it if available and setting its sensitivity and delay values. The anti-chop eye kit is an option available from RaceGun that requires airsmith installation, as the Autococker receiver must be drilled and milled to mount the infrared emitter and sensor. The Use LED checkbox turns on or off the circuit board LED that flashes when the trigger is pulled. There is also a very innocuous looking item under options labeled Use Trigger Filter. By default it is on, and it tells the RaceGun operating software to ignore the short, pulsed signals it receives at the start and finish of a trigger pull caused by switch bounce. Turning off the filter causes the RaceGun to interpret this electronic noise as separate trigger pulls. On the test set-up, this typically caused the RaceGun to fire both on the trigger pull and release, and tapping lightly on the trigger would cause noticeably more firing cycles than the number of times the trigger was fully pulled. In order to be legal for use in most tournaments, and for that matter at most paintball fields in the US, the Trigger Filter must be on. The Use Feeder checkbox activates a signal to a port on the RaceGun circuit board that can be used to activate an agitating hopper, or positive feed system like the AGD Warp Feed. Field testing of the RaceGun conversion was performed at Righteous Paintball in Jupiter Farms, Florida. The super light trigger pull took a little to get used to the author shot himself in the foot in the starting box moments before the first game. As the day progressed, it became abundantly clear that the RaceGun frame had most definitely breathed new life into an Autococker that was more than eight years old. Gone was the possibility of short-stroking, and the rate of fire turned the heads of even the shooters of high end custom electronic paintguns on the field. A variety of paint brands were used in testing, and aside from a sample of very old paint that had become lumpy, feeding was flawless. With the older paint, and the Mini Rock regulator adjusted to low pressure, any misfed paint simply stopped the bolt, rather than leading to a ball chop. In all, the RaceGun electronic conversion has proved to be a very impressive product. It was surprisingly fast and simple to install even when compared to mechanical trigger frames, and made a drastic difference in both the performance and ease of use of the Autococker which became its host. For experienced Autococker users who have been thinking of buying a new high-end electro in order to keep up with the firepower race, the RaceGun conversion offers an attractive alternative, giving them the high end performance at half the price of a higher end electro, yet still keeping the gun and accessories with which they are familiar.
|
| Copyright © 1992-2019
Corinthian Media Services. WARPIG's webmasters can be reached through our feedback form. All articles and images are copyrighted and may not be redistributed without the written permission of their original creators and Corinthian Media Services. The WARPIG paintball page is a collection of information and pointers to sources from around the internet and other locations. As such, Corinthian Media Services makes no claims to the trustworthiness or reliability of said information. The information contained in, and referenced by WARPIG, should not be used as a substitute for safety information from trained professionals in the paintball industry. |
 While
many people look upon the Autococker as complex, the ideas behind its operation
are simple. At its heart is the pump action system of the WGP Sniper.
At rest, a hammer in the lower receiver is held back against the mainspring
by the sear. When the trigger is pulled, the sear releases the hammer
against the valve, releasing gas up into the bolt, which redirects the
gas burst, propelling the waiting ball out of the barrel. In the
original pump Sniper, this is where the time would come for the user to
pull back the pump, which would draw back the bolt allowing the next ball
to drop into the breech, and catching the hammer, and pulling it to the
rear.
While
many people look upon the Autococker as complex, the ideas behind its operation
are simple. At its heart is the pump action system of the WGP Sniper.
At rest, a hammer in the lower receiver is held back against the mainspring
by the sear. When the trigger is pulled, the sear releases the hammer
against the valve, releasing gas up into the bolt, which redirects the
gas burst, propelling the waiting ball out of the barrel. In the
original pump Sniper, this is where the time would come for the user to
pull back the pump, which would draw back the bolt allowing the next ball
to drop into the breech, and catching the hammer, and pulling it to the
rear.
 The
Autocockers two-step trigger pull made it very stable and consistent compared
to the other early mass produced semis which were predominantly of a blowback
design. The downside to the two-step trigger pull is that the function
of the paintgun depends on the rhythm of the person behind the trigger.
The trigger must be held back long enough for the full recocking cycle
to occur, and for a ball to drop into the chamber. There is also
a practical limit to how short the trigger pull can be adjusted without
creating short-stroke problems (where the hammer fires, but a full recock
does not occur.)
The
Autocockers two-step trigger pull made it very stable and consistent compared
to the other early mass produced semis which were predominantly of a blowback
design. The downside to the two-step trigger pull is that the function
of the paintgun depends on the rhythm of the person behind the trigger.
The trigger must be held back long enough for the full recocking cycle
to occur, and for a ball to drop into the chamber. There is also
a practical limit to how short the trigger pull can be adjusted without
creating short-stroke problems (where the hammer fires, but a full recock
does not occur.)
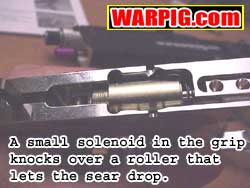 An
analogy for how the RaceGun sear works is to envision a hundred pound bag
of dog food sitting on a table with someone wanting to get it off the table
without touching it. It could be done by simply flipping over the
table, but that would take a fair amount of strength. With a lot
less energy, one could simply pull out one of the legs from under the table,
and let the whole thing fall over under the weight of the bag. With
less energy spent per shot, the RaceGun batteries can fire more shots between
charges than a grip frame which uses a solenoid to move the sear directly.
An
analogy for how the RaceGun sear works is to envision a hundred pound bag
of dog food sitting on a table with someone wanting to get it off the table
without touching it. It could be done by simply flipping over the
table, but that would take a fair amount of strength. With a lot
less energy, one could simply pull out one of the legs from under the table,
and let the whole thing fall over under the weight of the bag. With
less energy spent per shot, the RaceGun batteries can fire more shots between
charges than a grip frame which uses a solenoid to move the sear directly.
 The
5 way mount included in the kit differed from the one appearing in the
manual. The unit in the manual was one sided, and the valve would
attach to it with a pair of screws. The mount included in the kit
for review was a wrap-around design. Rather than a screw holding
into the valve, a single screw slides through one side of the mount and
threads into the other. Tightening the screw clamps the mount down
around the 5 way, locking it securely in place. The mount also holds
the valve upside-down from what is shown in the manual, so that the single
input port was on the bottom, and two outputs to the ram were on top.
Due to the shape of the parts it was clear to see the way everything fit
together, and overcome the confusion from the manual.
The
5 way mount included in the kit differed from the one appearing in the
manual. The unit in the manual was one sided, and the valve would
attach to it with a pair of screws. The mount included in the kit
for review was a wrap-around design. Rather than a screw holding
into the valve, a single screw slides through one side of the mount and
threads into the other. Tightening the screw clamps the mount down
around the 5 way, locking it securely in place. The mount also holds
the valve upside-down from what is shown in the manual, so that the single
input port was on the bottom, and two outputs to the ram were on top.
Due to the shape of the parts it was clear to see the way everything fit
together, and overcome the confusion from the manual.
 With
the new pneumatics in place, the next step was to check the sear lug.
This is the small part, screwed into the hammer which extends though a
slot in the body and catches on the sear to hold the hammer back in the
cocked position. It should not extend past the body, but should be
1-1.5mm from the body. The fit of the sear lug is tested by screwing
on the grip frame, and manually cocking the hammer. If it easily
cocks, and holds, the lug is in the right position. Since this Autococker
was already set up properly, the lug was in the right spot and needed no
adjustment.
With
the new pneumatics in place, the next step was to check the sear lug.
This is the small part, screwed into the hammer which extends though a
slot in the body and catches on the sear to hold the hammer back in the
cocked position. It should not extend past the body, but should be
1-1.5mm from the body. The fit of the sear lug is tested by screwing
on the grip frame, and manually cocking the hammer. If it easily
cocks, and holds, the lug is in the right position. Since this Autococker
was already set up properly, the lug was in the right spot and needed no
adjustment.
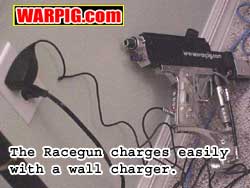 The
next step was to plug the RaceGun wall power adapter into the grip and
charge the battery for four hours. Undeniably, after less than 20
minutes to do the physical installation, four hours of battery charging
time seemed like an eternity to wait to try things out. The LED indicator
on the back of the frame shows that the battery is charging by blinking
between green and red.
The
next step was to plug the RaceGun wall power adapter into the grip and
charge the battery for four hours. Undeniably, after less than 20
minutes to do the physical installation, four hours of battery charging
time seemed like an eternity to wait to try things out. The LED indicator
on the back of the frame shows that the battery is charging by blinking
between green and red.
 All
of the timing values of the RaceGun equipped Autococker are handled in
the electronics, so no physical adjustments or tweaking is needed during
installation. As it ships from the factory, it is set to shoot at
a maximum of 10 balls per second. The default timing values ensure
maximum compatibility with all Autocockers. Basically they are conservative
timing values set to ensure reliable performance.
All
of the timing values of the RaceGun equipped Autococker are handled in
the electronics, so no physical adjustments or tweaking is needed during
installation. As it ships from the factory, it is set to shoot at
a maximum of 10 balls per second. The default timing values ensure
maximum compatibility with all Autocockers. Basically they are conservative
timing values set to ensure reliable performance.
 The
Autocockers timing rod was manually pulled back to cock it, and a Crossfire
4500 psi 88ci compressed air system was screwed into the ASA, to begin
testing with dry firing. As per the single page of the manual which
deals with operation, the top button on the grip frame was pressed once
to turn the power on. Safe mode was indicated by the LED lighting
green. Then both the top and bottom buttons were pressed and held
for about one second, switching into live mode, with the LED switching
to red.
The
Autocockers timing rod was manually pulled back to cock it, and a Crossfire
4500 psi 88ci compressed air system was screwed into the ASA, to begin
testing with dry firing. As per the single page of the manual which
deals with operation, the top button on the grip frame was pressed once
to turn the power on. Safe mode was indicated by the LED lighting
green. Then both the top and bottom buttons were pressed and held
for about one second, switching into live mode, with the LED switching
to red.
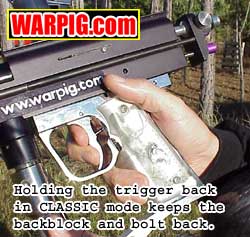 Pulling
the trigger revealed that the frame was running in classic mode.
In this mode, the electronic trigger functions most like a normal Autococker.
Pulling the trigger releases the hammer, then pulls back the cocking block,
but the block remains back until the trigger is released. With a
few trigger pulls it was evident that the light electronic trigger was
a radical change for the Autococker, making fast shooting astoundingly
easier. The trigger features two adjustment screws, one to limit
front travel, and one to limit rear travel. Without any adjustment,
the trigger pull was approximately 1mm when measured at the bottom of the
trigger. The trigger return spring is an optional part, and the frame
provided a short, crisp, responsive pull without it, so it was not used
for this review, and no trigger adjustment was needed.
Pulling
the trigger revealed that the frame was running in classic mode.
In this mode, the electronic trigger functions most like a normal Autococker.
Pulling the trigger releases the hammer, then pulls back the cocking block,
but the block remains back until the trigger is released. With a
few trigger pulls it was evident that the light electronic trigger was
a radical change for the Autococker, making fast shooting astoundingly
easier. The trigger features two adjustment screws, one to limit
front travel, and one to limit rear travel. Without any adjustment,
the trigger pull was approximately 1mm when measured at the bottom of the
trigger. The trigger return spring is an optional part, and the frame
provided a short, crisp, responsive pull without it, so it was not used
for this review, and no trigger adjustment was needed.
 Included
with the RaceGun kit was a CD with RIP software. RIP, signified by
a tombstone icon as in Rest In Peace stands for Racegun Interface Program,
and is used to communicate with the RaceGun electronics. RIP is also
available for download on the RaceGun web site, and it comes in two versions,
one for the Windows operating system for use on laptop and desktop computers,
and one for the Palm operating system, allowing the RaceGun to be easily
reprogrammed from a PDA like a Palm Pilot that can be easily stowed in
a gearbag and taken to the field. The Palm version requires that
AppForge Booster software be installed on the PDA before RIP will work.
This is a free application that can be downloaded at www.appforge.com.
Included
with the RaceGun kit was a CD with RIP software. RIP, signified by
a tombstone icon as in Rest In Peace stands for Racegun Interface Program,
and is used to communicate with the RaceGun electronics. RIP is also
available for download on the RaceGun web site, and it comes in two versions,
one for the Windows operating system for use on laptop and desktop computers,
and one for the Palm operating system, allowing the RaceGun to be easily
reprogrammed from a PDA like a Palm Pilot that can be easily stowed in
a gearbag and taken to the field. The Palm version requires that
AppForge Booster software be installed on the PDA before RIP will work.
This is a free application that can be downloaded at www.appforge.com.
 Under
timing, the first option selectable is firing mode. The first selectable
mode is semi-auto. This fires the Autococker as a semi-auto paintgun.
The default mode is classic. As mentioned previously, Classic mode
has the feel most similar to a standard Autococker, and gives some flexibility,
in that if a player begins out-shooting their hopper, they can hold back
the trigger longer to ensure good feeds, and still be up and running if
they dont have a PC or PDA at the field to reset the timing values.
The drawback to Classic mode is that the extra delay possibly introduced
by a long trigger pull makes it easier to attain a maximum rate of fire
in Semi-automatic mode.
Under
timing, the first option selectable is firing mode. The first selectable
mode is semi-auto. This fires the Autococker as a semi-auto paintgun.
The default mode is classic. As mentioned previously, Classic mode
has the feel most similar to a standard Autococker, and gives some flexibility,
in that if a player begins out-shooting their hopper, they can hold back
the trigger longer to ensure good feeds, and still be up and running if
they dont have a PC or PDA at the field to reset the timing values.
The drawback to Classic mode is that the extra delay possibly introduced
by a long trigger pull makes it easier to attain a maximum rate of fire
in Semi-automatic mode.
 Sliders
allow 5 timing values to be adjusted. By default, all but one of
them are frozen. They become unlocked by selecting expert mode.
By tweaking each of these timing values, the maximum rate of fire can be
achieved. Properly setting the timing is a fairly fast procedure,
that isnt well detailed in the manual. Josh Coray from Adrenaline
Marker Products provided guidance in the process. For most of the
values, it is basically a matter of setting, putting the data into the
frame and testing.
Sliders
allow 5 timing values to be adjusted. By default, all but one of
them are frozen. They become unlocked by selecting expert mode.
By tweaking each of these timing values, the maximum rate of fire can be
achieved. Properly setting the timing is a fairly fast procedure,
that isnt well detailed in the manual. Josh Coray from Adrenaline
Marker Products provided guidance in the process. For most of the
values, it is basically a matter of setting, putting the data into the
frame and testing.
 The
next value is the Dwell setting. This is how long the RaceGun waits
from the time the trigger is pulled until the bolt begins opening.
On Joshs advice this was set to 7ms. This value can be tweaked to
the users hearts desire, but its important to make sure that the bolt
stays closed long enough for the gas pressure to drop in the breech, or
gas will blow-back up the feed neck potentially causing feed problems.
The
next value is the Dwell setting. This is how long the RaceGun waits
from the time the trigger is pulled until the bolt begins opening.
On Joshs advice this was set to 7ms. This value can be tweaked to
the users hearts desire, but its important to make sure that the bolt
stays closed long enough for the gas pressure to drop in the breech, or
gas will blow-back up the feed neck potentially causing feed problems.
 The
final timing value is close, or the amount of time the RaceGun expects
that it will take the bolt to close before firing the first shot.
For testing this value was simply set to 2 ms shorter than the open time
(figuring on a slightly faster close time since the gas ram is not fighting
against the mainspring when closing), at 24 seconds. Throughout the
adjustment process, the RIP software shows the maximum rate of fire that
can be achieved with the timing values. In the case of Full-Auto
mode, this will be the actual rate of fire, in Semi-Auto and Classic, it
is the maximum that a user can possibly reach. These numbers will
be different for each Autococker fitted with the RaceGun frame, in fact
Josh Coray noted that even the model of bolt used can have a noticeable
impact on the close and open speeds. The settings used on the Autococker
for review brought the maximum rate of fire up from the default value of
9.7 balls per second up to 13.9 balls per second.
The
final timing value is close, or the amount of time the RaceGun expects
that it will take the bolt to close before firing the first shot.
For testing this value was simply set to 2 ms shorter than the open time
(figuring on a slightly faster close time since the gas ram is not fighting
against the mainspring when closing), at 24 seconds. Throughout the
adjustment process, the RIP software shows the maximum rate of fire that
can be achieved with the timing values. In the case of Full-Auto
mode, this will be the actual rate of fire, in Semi-Auto and Classic, it
is the maximum that a user can possibly reach. These numbers will
be different for each Autococker fitted with the RaceGun frame, in fact
Josh Coray noted that even the model of bolt used can have a noticeable
impact on the close and open speeds. The settings used on the Autococker
for review brought the maximum rate of fire up from the default value of
9.7 balls per second up to 13.9 balls per second.
 Authors
Notes: In 1996 at the San Francisco GWS tournament I played with
the Lil Rascals, substituting for a player who didnt show. I used
a borrowed Autococker, and through the tournament had nothing but trouble.
Theres a rhythm needed to shoot an Autococker fast and while I never seem
to have trouble railing out paint at the chrono, it is a whole other story
tucked in a bunker with paint coming in. Ever since that tournament,
Ive shied away from Autocockers for personal use its not that they
are bad, they just werent for me. The advent of the swing trigger
helped a lot in that regard, but The RaceGun conversion took rhythm and
trigger pull style entirely out of the equation, and made the Autococker
a joy for me to shoot. Physically its a simple mechanism compared
to some of the other conversions out there, and now Im more than happy
to hit the field with this supped up Cocker. Put simply, it rips.
Authors
Notes: In 1996 at the San Francisco GWS tournament I played with
the Lil Rascals, substituting for a player who didnt show. I used
a borrowed Autococker, and through the tournament had nothing but trouble.
Theres a rhythm needed to shoot an Autococker fast and while I never seem
to have trouble railing out paint at the chrono, it is a whole other story
tucked in a bunker with paint coming in. Ever since that tournament,
Ive shied away from Autocockers for personal use its not that they
are bad, they just werent for me. The advent of the swing trigger
helped a lot in that regard, but The RaceGun conversion took rhythm and
trigger pull style entirely out of the equation, and made the Autococker
a joy for me to shoot. Physically its a simple mechanism compared
to some of the other conversions out there, and now Im more than happy
to hit the field with this supped up Cocker. Put simply, it rips.