  |
|
|
|
|
|
|
| |
|
|
|
|
|
|
What
do you think?
|
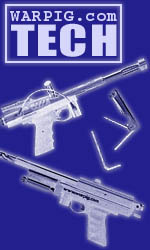
Omega Sear and Trigger Set For the WGP Autococker by Bill Mills
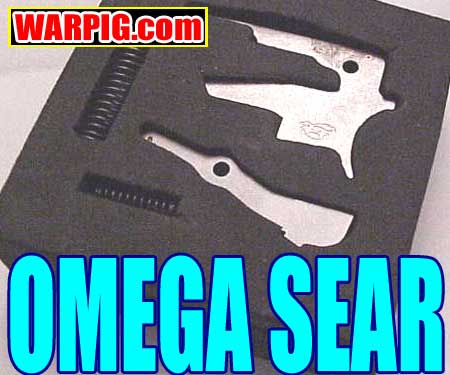
Roller sears have become a popular accessory for the WGP Autococker. In a stock Autococker, the trigger is not a pivoting piece as it is with many paintguns. Instead, the trigger is a metal plate that slides back and forth in the trigger frame. The resulting trigger feel is akin to the sliding trigger of a Colt 1911 automatic pistol. An angled ledge on the back of the trigger slides against the rounded lower front edge of the sear. The sear is a lever, which holds the hammer back. When the trigger is pulled, the angled ledge lifts the front of the sear, dropping its back end and releasing the hammer to hit the valve.
Roller sears have a small ball bearing roller on their front. Micro sized bearings let the rollers smooth surface glide across the trigger plate allowing for a smoother trigger pull. Omega goes a step further with their trigger plate. As the trigger is pulled, it has a tendency to try and rotate clockwise (as viewed from the paintguns right side) because the finger presses below its centerline. When the trigger is returning, the return spring is pressing at the bottom, while the timing rod and 3 way valve are offering resistance at the top. This causes a counter-clockwise rotation. This is in part why two finger sliding triggers have a tendency to bind, and never became popular they move the finger contact point lower amplifying this problem. The Omega trigger plate and sear are both made of hardened steel for durability.
As an additional feature, the Omega sear has a notch on its back end that engages the sear spring, preventing it from shifting or sliding. Also included in the plate and sear sets dense foam packaging are a new sear and trigger return spring. Installation takes a few minutes. For testing, the set went into a 1998 Autococker with stock molded trigger frame. First, the trigger frame was removed. For players wanting to keep their safety (many remove it as part of a trigger job) it is important not to lose the safety spring and its ball bearing at this point. When they are removed, the retaining clip can be pulled off of the safety, and the safety can be slid out the side of the frame. The trigger shoe comes off, and the sears pivot pin is pulled out the side. The only tools used for this process are the hex wrenches of appropriate sizes, and a pair of pliers to pull out the sears pivot pin. The trigger group then slides easily out of the grip frame, and is replaced with the Omega components, then the procedure is reversed for reassembly.
|
| Copyright © 1992-2019
Corinthian Media Services. WARPIG's webmasters can be reached through our feedback form. All articles and images are copyrighted and may not be redistributed without the written permission of their original creators and Corinthian Media Services. The WARPIG paintball page is a collection of information and pointers to sources from around the internet and other locations. As such, Corinthian Media Services makes no claims to the trustworthiness or reliability of said information. The information contained in, and referenced by WARPIG, should not be used as a substitute for safety information from trained professionals in the paintball industry. |
 Omega
Series Accessories from Extreme Rage Sports is officially launching their
rapidly expanding line of paintball products at the 2002 International
Amateur Open. Their timer grip has been out on the market for a while,
but the IAO will see the unveiling of machined metal accessories.
As a sneak preview to the product line, WARPIG.com received a production
model Omega roller sear and trigger set in advance of its Pittsburgh debut.
Omega
Series Accessories from Extreme Rage Sports is officially launching their
rapidly expanding line of paintball products at the 2002 International
Amateur Open. Their timer grip has been out on the market for a while,
but the IAO will see the unveiling of machined metal accessories.
As a sneak preview to the product line, WARPIG.com received a production
model Omega roller sear and trigger set in advance of its Pittsburgh debut.
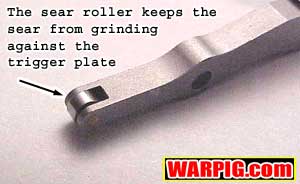 The
smoothness of an Autocockers trigger pull depends in part on how smooth
and well lubricated the front of the sear and the angled ledge on the trigger
plate are. If they are dry and or have rough edges, the trigger pull
will be rough as the two surfaces grate against one another. The
traditional trigger job for an Autococker includes polishing these surfaces
to make them as smooth as possible.
The
smoothness of an Autocockers trigger pull depends in part on how smooth
and well lubricated the front of the sear and the angled ledge on the trigger
plate are. If they are dry and or have rough edges, the trigger pull
will be rough as the two surfaces grate against one another. The
traditional trigger job for an Autococker includes polishing these surfaces
to make them as smooth as possible.
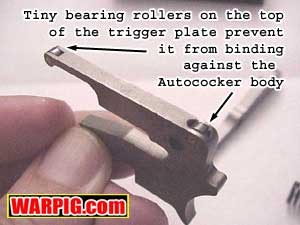 When
the trigger plate rotates, its top surface presses harder into the bottom
of the Autocockers receiver. This is another surface that must be
both smooth and properly lubricated for a smooth trigger pull, especially
at the rear of the trigger stroke. Omegas trigger plate adds a second
and third ball bearing roller to the mix one in the back to smooth the
trigger pull, and one in the front to smooth its return. This is
an innovative feature not yet found in products from other manufacturers.
When
the trigger plate rotates, its top surface presses harder into the bottom
of the Autocockers receiver. This is another surface that must be
both smooth and properly lubricated for a smooth trigger pull, especially
at the rear of the trigger stroke. Omegas trigger plate adds a second
and third ball bearing roller to the mix one in the back to smooth the
trigger pull, and one in the front to smooth its return. This is
an innovative feature not yet found in products from other manufacturers.
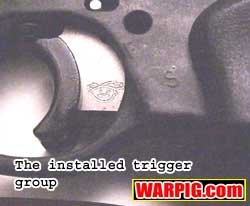 The
reassembled Autococker with the Omega components shows the Extreme Rage
logo engraved in the side of the trigger plate. The resulting trigger
pull on the test Autococker is noticeably smoother, while its length has
not been changed. The difference in the trigger pull is a change
in feel from sliding metal surfaces to the smooth feel of the rollers.
The trigger return is fast and responsive. This is an important factor
to check after changing trigger springs, as some airsmiths or players install
a very light trigger return spring to lighten the trigger pull, and end
up with a trigger that does not reset reliably, especially under rapid
fire.
The
reassembled Autococker with the Omega components shows the Extreme Rage
logo engraved in the side of the trigger plate. The resulting trigger
pull on the test Autococker is noticeably smoother, while its length has
not been changed. The difference in the trigger pull is a change
in feel from sliding metal surfaces to the smooth feel of the rollers.
The trigger return is fast and responsive. This is an important factor
to check after changing trigger springs, as some airsmiths or players install
a very light trigger return spring to lighten the trigger pull, and end
up with a trigger that does not reset reliably, especially under rapid
fire.