  |
|
|
|
|
|
|
| |
|
|
|
|
|
|
What
do you think?
|
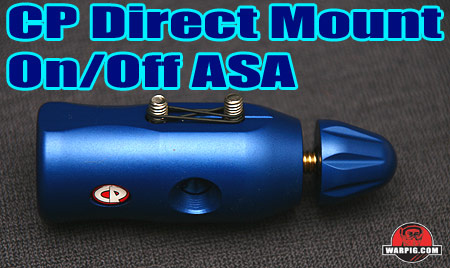
CP's Direct Mount On/Off
When in the mid 1990s, adjustable output compressed air systems were what the top paintball players were shooting. In the years since, preset screw in systems have become popular largely due to their reduced size and weight. One thing most screw-in presets lack is an on-off valve. By using a pin valve to turn the regulator on and off long o-ring life requires the same degassing steps as a typical CO2 tank – unscrew the tank slowly while dry firing. On/Off ASAs add the flexibility of turning the valve in a CO2 tank or screw-in HPA system on or off before removal, and that is just what Custom Products Direct Mount On/Off does. Additionally CP's offering has a degassing vent, so that when the ASA is turned to the off position, the gas line to the marker is vented to the air relieving internal pressure so that the tank can be removed without o-ring damage (degassing of the marker is still usually necessary as enough gas often remains between the regulator and valve to fire 2 or more shots.) Mounting the on/off is simple, as it includes a pair of industry standard 10-32 inline mounting screws compatible with the grip frames of most paintguns. These screws are secured for shipping with an o-ring stretched over their ends. This is important, as the ASA's internal pin depressor shaft is slotted in its center, and the screws make sure it remains properly aligned so that it does not block their reinsertion. The ASA features a pair of output ports, allowing it to be hosed to the marker from either side. Both ports have three gas channels feeding to them from the valve and ASA. After one port is fitted with a hose, the remaining port can be fitted with a pressure gauge to monitor the HPA system's output pressure or blocked with a plug screw. A plug screw is included with the ASA, though it and any fittings or gauges should be sealed with thread sealing tape or a liquid thread sealer for an airtight connection.
The screw system on which the valve operates is made from brass which provides a very low friction surface against the threaded aluminum ASA body. The low friction drive screw is combined with a narrow valve depressor and sealing surface design. Because the parts that move back and forth to open the valve have a small surface area, the force that is exerted on them by gas is kept to a minimum. The result is an easy to turn valve control.
The Direct Mount On/Off is also designed to be readily rebuilt. The rebuilding process is simple, and consists basically of cleaning, lubricating, and replacing o-rings if they have become damaged, worn or flattened with time.
A small brass main seal retainer disk also comes out with the plunger.
With the assembly in pieces, cotton swabs, paper towels and water or rubbing alcohol can be used to remove dirt and old oil or grease.
It is important to note the alignment of the plunger's screw slot when sliding it back into the Direct Mount On/Off body. The slot must line up with the mount screw holes in order to allow them to clear properly. It is a good idea to slip one or both mount screws into the ASA body at this point, to prevent the plunger shaft from rotating and blocking them before re-mounting it to a marker. A piece of tape on a screw end, or the shipping o-ring stretched and doubled over the tips of both screws can help hold them in place. CP also recommends greasing the front o-ring of the brass wall before pressing it into place. From that point, the ASA is ready to reinstall on a marker. Aligning the gas slot on the rear face of the rear wall horizontally is not necessary, however it will line up its side gas slots with the holes carrying gas to the output ports, minimizing air flow restrictions. The Custom Products Direct Mount On/Off ASA proved easy to install and rebuild. In use, it also was quite notable in how little effort was required to operate its on/off valve compared to similar products.
|
| Copyright © 1992-2019
Corinthian Media Services. WARPIG's webmasters can be reached through our feedback form. All articles and images are copyrighted and may not be redistributed without the written permission of their original creators and Corinthian Media Services. The WARPIG paintball page is a collection of information and pointers to sources from around the internet and other locations. As such, Corinthian Media Services makes no claims to the trustworthiness or reliability of said information. The information contained in, and referenced by WARPIG, should not be used as a substitute for safety information from trained professionals in the paintball industry. |
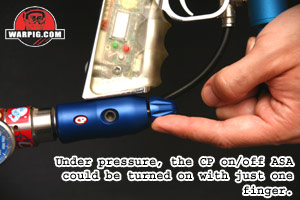 In use for testing, little was surprising, as the ASA operated much as one would expect. It effectively turned on and off the gas supplies of multiple CO2 tanks and screw-in air systems, and vented the airlines when turned off. Quite notable was the ease with which it operates. Most on/off ASAs require a firm grip and solid turning force. In contrast, CP's product could effectively turn on and off a Crossfire HPA system with only the pressure of one finger applied to the on/off knob – without actually gripping it.
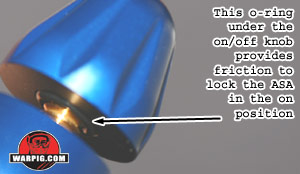 To reduce the risk of accidentally turning the valve off, or partially closing the gas supply from rubbing the ASA on a bunker or the ground, an o-ring is embedded in the back side of the knob. This provides locking friction when the ASA is in the fully open/on position.
 Rebuilding begins with removing the ASA from the marker, and then pulling out its friction fit brass wall from inside the ASA opening. The brass wall has gas ports on either side, and a pair of needle-nosed pliers can be used to grasp it through these openings and pull it straight out.
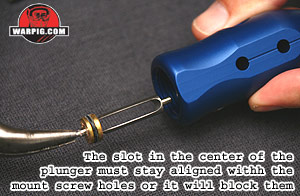 The central pin depressing plunger can then be similarly removed with needle-nosed pliers, being careful to grasp it near its end and not mar its surface. It is important to note, that the mounting screws must not be in the body of the ASA during this step, as they would serve to lock the plunger in place.
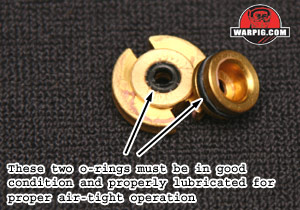 Two o-rings make up the critical seals of the Direct Mount On/Off. One is a size 011 o-ring on the outside of the seal retainer, and the other is a size 006 on the back of the brass wall. These two seals should be carefully inspected, and if there is any doubt, or if there is any leaking of gas around the ASA mounting screws, both should be replaced.
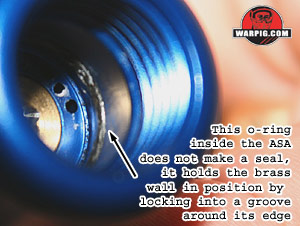 An additional o-ring is located in a groove inside the ASA. This o-ring does not provide an airtight seal however, so it can still function properly even with a fair amount of wear. This o-ring simply serves to hold the brass wall in place during operation.
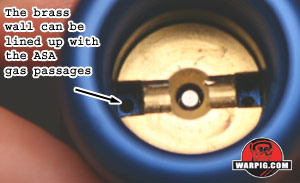 After cleaning the components, they are assembled in a reverse of their disassembly procedure. The forward (relative to the marker, when mounted) tip of the plunger should be greased with paintgun grease before reinsertion, and its rear tip similarly greased after it is installed, but before the seal retainer is put into place. The cupped end of the seal retainer faces the front of the ASA assembly.