  |
|
|
|
|
|
|
| |
|
|
|
|
|
|
Special thanks to: and Great American Paintballs For their assistance with this article What
do you think?
|

Centerflag Products' Hyperframe for the Automag by Bill Mills March 2001 In a police training facility in a warehouse north of Chicago I saw something amazing. It was early winter 1999 when I had the opportunity to test fire a prototype Centerflag Hyperframe. Dennis Ashley from Centerflag products had the frame installed on a powerfeed Automag that was connected to a prototype 2XS loader system (the loader is expected to be released late 2001 from a different company). We fired the 'mag fully automatic at 22, yes, that's 22 shots per second. That level of firepower is truly jaw-dropping. A half second burst swept left to right proved sufficient to make one or two hits each on the three person size targets on the target range. The demonstration showed not only where paintball firepower could go on the future, but also that the hardware side of the Automag could hold up at very high rates of fire.
So just what are the advantages of going electronic? The one most immediately noticeable on the field is the feel of the trigger. Instead of the relatively long, sometimes heavy trigger pull associated with a mechanical trigger system, an electronic trigger is an electrical switch. The switch, typically a small microswitch in paintball use, can provide for a short, light, and crisp trigger pull. On the Hyperframe, the trigger pull is approximately 0.5mm when measured at the center of the first finger curve. A better trigger pull gives the operator the ability to shoot more shots per second, and to fire more accurately, as the paintgun is not thrown off target as much by gross finger movement.
HOW IT WORKS In order to understand how the Hyperframe works, it is important to first understand the operation of an Automag. The design philosophy behind the Automag is both simple in concept, and yet very advanced for its day. The 'mag provides a consistent release of gas on the paintball by regulating both the pressure, and the exact volume of propellant gas. The gas entering a 'mag first goes through the AIR (Advanced Integrated Regulator) valve, through an on/off valve, and into an open space known in pneumatics terminology as an accumulator. The gas presses against a cylinder in the center of bolt. The sear, which rocks back and forth like a seesaw on a pivot in the grip rail holds the bolt back against the gas pressure. When the trigger is pulled the sear is rotated counterclockwise (when viewed from the left) releasing the bolt while simultaneously actuating the on/off valve by depressing the valve pin. This seals the accumulator off from the AIR valve, while the gas pushes the bolt forward, and is then released through the bolt and out the barrel. With no gas pressure in the accumulator, the bolt spring returns the bolt to the rear, and gas pressure from the regulator pushes the on/off valve pin back out, resetting the sear to hold the bolt while the accumulator recharges.
Installation
It was decided to use a Crossfire compressed air system, rather than CO2 to review the Hypeframe. The Minimag's steel braided hose was removed from the AIR Valve and vertical ASA. While the vertical ASA connector was not going to be used, and could have been removed from the grip rail, it was left in place, as a possible mount point for an ASA threaded foregrip. When attaching a Shocktech drop forward to the Hyperframe it was discovered that due to circuit board placement, the frame needs to use bottomline screws 1/8" shorter than those which I had in stock. Rather than delay a trip to the paintball field with a trip to the hardware store, a temporary solution of using longer screws and a Y2K Kradle drop forward mount bar acting as a spacer made for a perfect fit. This assembly was later swapped for shorter screws. A macroline kit from I&I Sports ran the gas from the drop forward to the AIR Valve.
Forward of the frame's rear grip frame screw hole is a second hole, providing access to the rear of the sear. With a mechanical trigger frame, the trigger must be depressed, pushing the on/off pin into the frame before the AIR Valve and bolt assembly can be removed from the body. With the Hyperframe, there is no mechanical link to achieve this. The sear access hole allows the use of a tool to press on the sear pushing in the on/off pin. This is especially important with Centerflag's narrower on/off pin which could be more easily damaged by interference with the 'mag body on removal.
The simple on/off and normal operation of the Hyperframe's electronics are easy. Changing modes and settings is not difficult, but it is not extremely intuitive. Electronic Operation Holding down the mode button for about 3 seconds activates the Hyperframe. The LCD will first display the number of shots which have been fired since the shot counter was last reset, followed by the display for the selected operational mode. The Hyperframe has three standard operational modes in which it may be used, each indicated by a single letter on the left of the display. Regardless of the mode, the LCD will read "FIrE" while the trigger is pulled. The operational modes choose what will be on the display while the Hyperframe is used, while the firing modes select how it will shoot. Mode "F" is basic operational mode, and is used to select the firing modes. This mode displays information about the present settings for rate of fire. Pressing and holding the Mode Set button while in the F operational mode, allows the selection of firing modes. The firing modes, are indicated by their name on the right hand side of the display. While selecting firing modes, their names will blink. Tapping the mode select button, cycles between the three firing modes, pressing the Mode button selects a choice. At this point, the settings for that mode will blink. Pressing Mode Set cycles through their values, while pressing Mode locks them in. For Semi mode there is one setting - maximum rate of fire. This is adjustable from 1 to 13 shots per second. It can be used to prevent ball chopping due to slow feed problems, or simply as a tool to train conserving paint, or handicapping a game against newer players.
Hypermode is Centerflag's flavor of enhanced firing. This mode has one variable - rate of fire, which ranges from 5 to 10 shots per second. When the trigger is pulled at a consistent 3-4 times per second, the Hyperframe will fire repeatedly at the selected rate. At the time of this writing, the only one of the Hyperframe's modes legal in the NPPL, many other tournaments, and many paintball insurance programs is the semiautomatic mode. A button inside the frame, accessible only by removing the left grip panel with a hex wrench, is the tournament lock button. Pressing this button cycles between "LO" (lock) and "ULO" (unlocked). When the Hyperframe is locked, only the operational modes may be changed. The firing modes and their variables are locked. Also at the time of this writing, the NPPL is making plans to allow only paintguns capable of semi-auto only, regardless of tournament locks. According to Centerflag's Josh Donahue, Centerflag is preparing a semi-auto only circuit board in case of that eventuality, with plans of offering it as an upgrade to customers who have the current Hyperframe at close to Centerflag's manufacturing cost. Pressing the mode button cycles out of the "F" operational mode and into the other operational modes. The "T" operational mode is the timer mode. Pressing the Mode Set button resets the timer, and holding Mode Set selects the minutes and seconds to be cycled through with the Mode button. The timer can be set from one second to 99 minutes and 59 seconds. In timer mode, pulling the trigger starts the countdown timer. The Hyperframe does not include a buzzer, or vibration feedback, the timer simply counts down remaining time, showing it on the display. Another tap of the mode button selects counter mode, indicated by a "C" on the left hand side of the display. In the counter operational mode, the LCD shows the number of shots fired since the counter was last reset. Resetting is achieved by pressing and holding the mode set button. From the counter mode, the mode button cycles back to the "F" mode. There is an additional maintenance mode "M" that is accessed by a separate button combination. While it is mentioned in the manual, Centerflag does not explain directly to most customers how to access it. The reason for this is that most customers should not need to use it, and misadjusting it can cause problems. The maintenance mode selects the length of the power pulse sent to the Hyperframe's solenoid. In any operational mode, pressing and holding the mode button will turn off the Hyperframe. Most of the Hyperframe's power consumption comes from actuating the solenoid. The microprocessor and LCD themselves draw very little power. In practical use, the Hyperframe can be turned on at the start of the day, and off at the end, with no settings needed to be changed during play. The only exception to this is using the game timer, which is a little inconvenient in that a twig, or tool of some sort will be needed before each game to reset it. On The Field
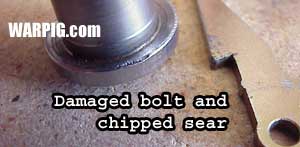
After getting an air fill, the next stop was the chrono station where several shot strings were fired double checking to verify that the Hyperframe was not causing any velocity problems - it ran smoothly, and all of the firing modes fired as expected. Also as expected, the light trigger pull made the 'mag sing. Fast shot strings were very easy to achieve. From the chrono to the field, several shot strings out into the woods showed that not only did the Hyperframe allow the 'mag to shoot at a noticeably higher rate, but the small trigger movements made it easy to keep on target with small shot groupings. The weekend of field testing was one week before the Diablo Mardi Gras Open, so one of Spacecoast's inflatable fields was being used by members of the Jax Warriors, and a few amateur teams from the area for practice. The other was in use for walk-on players. The Hyperframe proved impressive on the field. The 'mag I had been used to shooting for years simply shot easier. After a conversation with another player, I traded paintguns with him, shooting his Angel while he tried the Hyperframe equipped 'mag. He was impressed by the feel and ability to shoot faster - commenting mostly on the compact size for an electronic paintgun - and mentioned interest in upgrading his 'mag which was currently serving as a backup. The Hyperframe equipped 'mag has all of the firepower of today's top electronic paintguns, but in a compact body, with the Automag's single tube structure Self Destruction Unfortunately, after about 800 shots were fired through it, problems arose. "Hssssssss. Kack! Kack! Hssssssss!" comes close to approximating the sound the 'minimag made when it ceased to function. Disassembly at the staging area revealed the problem. With the Hyperframe and Centerflag on/off installed, the sear was not fully resetting against the bolt. Instead the tip of the sear was catching on the outside edge of the bolt. This was apparent in a ring of small gouges around the bolt. While the 'mag worked through this, it was chipping steel off of the bolt with every shot - until the sear chipped and would no longer catch the bolt properly - ouch!
Granted, I probably could have bribed an AGD tech with a bottle of IBC Root Beer, but since the problem was caused by Centerflag's product, I went to Centerflag. Over the phone, I spoke to Josh Donahue. Josh explained that Centerflag Product's view is that they will take care of problems caused by their products, and provide the support needed to make sure their products work properly. He suggested that since I would be at the Diablo Mardi Gras Open the next weekend, I could simply bring the 'mag to one of their techs there. In New Orleans, I spoke to Jeff Cardwell, one of Centerflag's techs. Jeff quickly provided a replacement AGD sear and bolt for the 'mag, and sorted through to find the longest on/off pin in his parts stock. As Centerflag owner Dennis Ashley explained to me, some older 'mags do not have the same part tolerances for how deep the on/off space in the AIR Valve assembly is drilled. This can affect the return of the sear. With a mechanical trigger, there are no problems, as hundredths of an inch difference in movement are not even noticed under the pull of a person's finger. However, with the short throw of Centerflag's low power solenoid, slight variances can cause large problems. Jeff also advised that if I had problems with the pin he gave me, I could also try using an AGD RT on/off assembly which he supplied. Afterh the tournament, I discovered both the new Centerflag pin, and the RT pin to still had a problem - the sear was damaging the bolt with each shot. After another call to Josh, he recommended the best course of action would be to send in the 'mag. That way, it could be fully inspected in their workshop, and any necessary adjustments made. Turnaround time at Centerflag Products for the adjustments was prompt, only a couple of days. Saving yet another trip in the UPS truck, Josh brought the Minimag with him, and I was able to pick it up in the Centerflag tech support booth at the NPPL Los Angeles Open (there is a theme here, Centerflag's techs are available at a lot of major events).
Summary The Hyperframe brings the feel and shooting
performance of electronic paintguns to the standard Automag and Minimag
as an upgrade that is both compact and elegant of design. It should
be noted however, that installation is not always trouble free. Due
to the precise tolerances needed to operate properly and still fit all
of the components within the grip, installation will sometimes require
special adjustment. It is definitely a good idea to test fire 20
or 30 shots after installation, and then thoroughly inspect the bolt, sear,
and on/off assemblies for any signs of unusual wear. If there are
problems in installation, contact Centerflag products for technical assistance.
Properly installed, Centerflag's slogan of "Get a grip, let it RIP" certainly
fits.
|
| Copyright © 1992-2019
Corinthian Media Services. WARPIG's webmasters can be reached through our feedback form. All articles and images are copyrighted and may not be redistributed without the written permission of their original creators and Corinthian Media Services. The WARPIG paintball page is a collection of information and pointers to sources from around the internet and other locations. As such, Corinthian Media Services makes no claims to the trustworthiness or reliability of said information. The information contained in, and referenced by WARPIG, should not be used as a substitute for safety information from trained professionals in the paintball industry. |
 Several
months went by from that demonstration until the release of the Hyperframe
on the market. Presently available, the Hyperframe provides an upgrade
path for Automag and Minimag owners to add a crisp electronic trigger pull
to their existing paintgun. While they function a bit differently,
Centerflag also makes similar grip frames for the Spyder and Piranha paintguns.
Several
months went by from that demonstration until the release of the Hyperframe
on the market. Presently available, the Hyperframe provides an upgrade
path for Automag and Minimag owners to add a crisp electronic trigger pull
to their existing paintgun. While they function a bit differently,
Centerflag also makes similar grip frames for the Spyder and Piranha paintguns.
 Another
advantage to electronic control is timing. Short stroking, or making
a partial trigger pull during rapid firing can lead to feeding problems,
and chopped paintballs. An electronic trigger system eliminates this
by using a microprocessor to precisely time the mechanical movements inside
the paintgun. With microprocessor driven electronics, additional
firing modes like burst, full auto, etc., are simply a matter of changes
in control software.
Another
advantage to electronic control is timing. Short stroking, or making
a partial trigger pull during rapid firing can lead to feeding problems,
and chopped paintballs. An electronic trigger system eliminates this
by using a microprocessor to precisely time the mechanical movements inside
the paintgun. With microprocessor driven electronics, additional
firing modes like burst, full auto, etc., are simply a matter of changes
in control software.
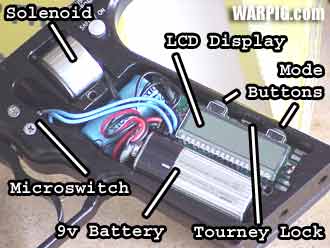 The
Hyperframe replaces the trigger rod linking the trigger and sear with a
microswitch to sense trigger pulls, control electronics, and an electromagnetic
solenoid to move the sear. A solenoid is little more than a coil
of wire. When electricity is run through it, a magnetic field is
generated, which draws a piece of iron closer to it. The Hyperframe's
solenoid is situated so that when it is actuated, it moves the Automag's
sear, releasing the bolt, and closing the on/off valve. Added into
the mix is a liquid crystal display (LCD) to provide feedback about the
various modes available in the Hyperframe's software, and control buttons
to select these modes.
The
Hyperframe replaces the trigger rod linking the trigger and sear with a
microswitch to sense trigger pulls, control electronics, and an electromagnetic
solenoid to move the sear. A solenoid is little more than a coil
of wire. When electricity is run through it, a magnetic field is
generated, which draws a piece of iron closer to it. The Hyperframe's
solenoid is situated so that when it is actuated, it moves the Automag's
sear, releasing the bolt, and closing the on/off valve. Added into
the mix is a liquid crystal display (LCD) to provide feedback about the
various modes available in the Hyperframe's software, and control buttons
to select these modes.
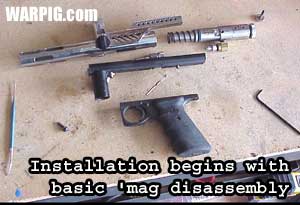 For
someone who is familiar with properly maintaining their Automag, armed
with the knowledge from Airgun Design's maintenance video, installing the
Hyperframe is not a terribly challenging task. It starts with disassembly
of the 'mag. The only tool required is a 1/8" hex wrench, though
a set of needle nosed pliers and o-ring pick definitely make the going
easier. For this review, a chrome bodied Minimag was chosen to host
the Hyperframe. The only parts on the 'mag which were not stock were
a sharkgill sight rail, and a LAPCO locking velocity adjuster.
For
someone who is familiar with properly maintaining their Automag, armed
with the knowledge from Airgun Design's maintenance video, installing the
Hyperframe is not a terribly challenging task. It starts with disassembly
of the 'mag. The only tool required is a 1/8" hex wrench, though
a set of needle nosed pliers and o-ring pick definitely make the going
easier. For this review, a chrome bodied Minimag was chosen to host
the Hyperframe. The only parts on the 'mag which were not stock were
a sharkgill sight rail, and a LAPCO locking velocity adjuster.
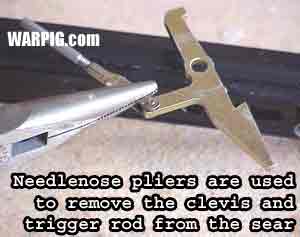 Once
disassembled, the original Automag trigger frame is set aside, replaced
entirely by the Hyperframe. The 'mag trigger rod connects to the
sear by a clip called a clevis. While this can be removed by hand,
needle nose pliers make the job much easier. The clevis pin is attached
to one of its two arms, while it passes through a hole in the other.
Spreading the two arms allows the clevis to be removed from the sear.
Like the grip frame the clevis and trigger rod are set aside for use as
spare parts on another 'mag or to return to a mechanical trigger.
Once
disassembled, the original Automag trigger frame is set aside, replaced
entirely by the Hyperframe. The 'mag trigger rod connects to the
sear by a clip called a clevis. While this can be removed by hand,
needle nose pliers make the job much easier. The clevis pin is attached
to one of its two arms, while it passes through a hole in the other.
Spreading the two arms allows the clevis to be removed from the sear.
Like the grip frame the clevis and trigger rod are set aside for use as
spare parts on another 'mag or to return to a mechanical trigger.
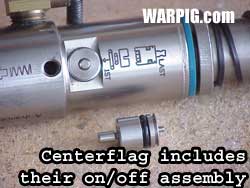 The
Hyperframe provides all of its features in a single, elegant package.
In order to use a single 9 volt battery as a power source, good enough
for a reasonable number of shots, Centerflag used a relatively small solenoid
(definitely small when compared to the E-Mag's 18 volt solenoid).
This small solenoid can deliver a limited amount of power, and has a very
short throw. Because of this, a perfect fit between the grip frame
and 'mag body is required, with little tolerance for error. Also,
the solenoid can have problems closing the Automag's on/off valve.
Because of this, Centerflag includes their own on/off valve pin and body.
The
Hyperframe provides all of its features in a single, elegant package.
In order to use a single 9 volt battery as a power source, good enough
for a reasonable number of shots, Centerflag used a relatively small solenoid
(definitely small when compared to the E-Mag's 18 volt solenoid).
This small solenoid can deliver a limited amount of power, and has a very
short throw. Because of this, a perfect fit between the grip frame
and 'mag body is required, with little tolerance for error. Also,
the solenoid can have problems closing the Automag's on/off valve.
Because of this, Centerflag includes their own on/off valve pin and body.
 Centerflag's
on/off assembly works with the standard Automag on/off top, but it has
a narrower body. While potentially not as strong against bending
stress as the stock, this pin provides less resistance for the solenoid
to overcome while operating. Swapping the on off body and pin is
fast and simple - making sure the seals are lubricated with Autolube in
the process. An o-ring pick is useful here to remove the on-off body,
but fingernails will also do the trick.
Centerflag's
on/off assembly works with the standard Automag on/off top, but it has
a narrower body. While potentially not as strong against bending
stress as the stock, this pin provides less resistance for the solenoid
to overcome while operating. Swapping the on off body and pin is
fast and simple - making sure the seals are lubricated with Autolube in
the process. An o-ring pick is useful here to remove the on-off body,
but fingernails will also do the trick.
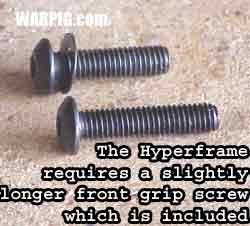 Dropping
the sear back into the grip rail, the Hyperframe was then attached, just
as a normal trigger frame is attached, without the extra step of guiding
the trigger rod into place, since it had now been removed. Because
the Hyperframe is a little thicker in the front than a standard 'mag frame
a longer front grip frame screw is needed - Centerflag includes it.
The original washer is still used. With the grip frame attached,
the AIR Valve and bolt assembly is reinstalled, and the new Hyperframed
'mag is ready to be tested.
Dropping
the sear back into the grip rail, the Hyperframe was then attached, just
as a normal trigger frame is attached, without the extra step of guiding
the trigger rod into place, since it had now been removed. Because
the Hyperframe is a little thicker in the front than a standard 'mag frame
a longer front grip frame screw is needed - Centerflag includes it.
The original washer is still used. With the grip frame attached,
the AIR Valve and bolt assembly is reinstalled, and the new Hyperframed
'mag is ready to be tested.
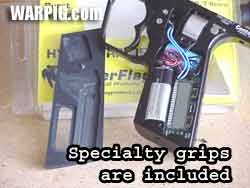 The
Hyperframe looks and feels much like a typical aftermarket two finger 45
style frame. It does have a few differences. It does not accept
standard Colt Model 1911 compatible grip panels. The reasons for
this are two fold. First, because the left grip has a window, providing
visibility to the LCD, and secondly, because the inside of the grip panels
are milled to basically provide "expansion space" in the grip frame.
A number of the internal components are wider than the frame's aluminum
body, and actually extend out, into the grips.
The
Hyperframe looks and feels much like a typical aftermarket two finger 45
style frame. It does have a few differences. It does not accept
standard Colt Model 1911 compatible grip panels. The reasons for
this are two fold. First, because the left grip has a window, providing
visibility to the LCD, and secondly, because the inside of the grip panels
are milled to basically provide "expansion space" in the grip frame.
A number of the internal components are wider than the frame's aluminum
body, and actually extend out, into the grips.
 Like
Airgun Design's E-Mag, the Hyperframe's physical safety is located on the
rear of the frame rather than by the trigger. For most paintguns,
a cross block trigger safety is a sound design. For the Hyperframe
however, that would leave a safety gap. The Hyperframe's safety blocks
the sear from movement, rather than the trigger. That way, accidental
electrical discharge, or electronic errors are incapable of firing the
marker when set on safe.
Like
Airgun Design's E-Mag, the Hyperframe's physical safety is located on the
rear of the frame rather than by the trigger. For most paintguns,
a cross block trigger safety is a sound design. For the Hyperframe
however, that would leave a safety gap. The Hyperframe's safety blocks
the sear from movement, rather than the trigger. That way, accidental
electrical discharge, or electronic errors are incapable of firing the
marker when set on safe.
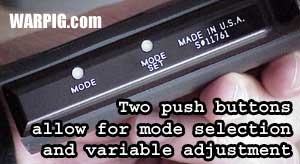 On
the back of the grip frame are two pushbuttons. The buttons are recessed
into the frame. While they can be pressed with the corner of a thumbnail
with great effort, they are most easily pressed with a small twig, or hex
wrench. Because of the way the buttons are recessed they are not
easily accessed on the field. However, the operation of the Hyperframe
will not typically require any adjustments to be made on the field.
On
the back of the grip frame are two pushbuttons. The buttons are recessed
into the frame. While they can be pressed with the corner of a thumbnail
with great effort, they are most easily pressed with a small twig, or hex
wrench. Because of the way the buttons are recessed they are not
easily accessed on the field. However, the operation of the Hyperframe
will not typically require any adjustments to be made on the field.
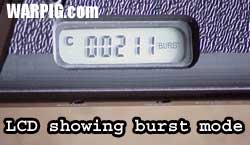 Burst
mode has two variables, the duration and rate of fire. The Hyperframe's
burst mode fires 3, 4, or 5 shot bursts at rates adjustable from 1 to 10
balls per second. As a safety feature, the burst fires only while
the trigger is held down. For example in 5 shot burst, the Hyperframe
will stop firing at two shots if that is when the trigger is released.
Burst
mode has two variables, the duration and rate of fire. The Hyperframe's
burst mode fires 3, 4, or 5 shot bursts at rates adjustable from 1 to 10
balls per second. As a safety feature, the burst fires only while
the trigger is held down. For example in 5 shot burst, the Hyperframe
will stop firing at two shots if that is when the trigger is released.
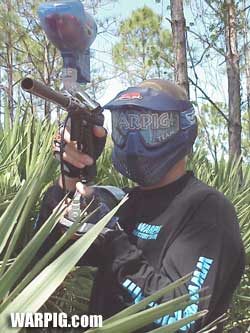
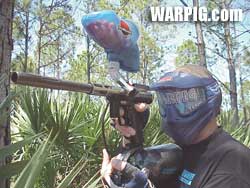
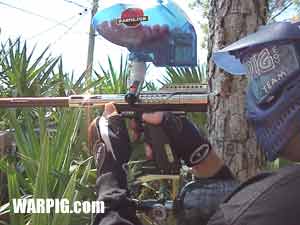 Technical
specifications are good to know, but performance on the field, is ultimately
important with paintball equipment. The 'mag was topped with an early
model Revolution loader filled with Great American Paintballs, and taken
to Spacecoast Paintball in Titusville, Florida.
Technical
specifications are good to know, but performance on the field, is ultimately
important with paintball equipment. The 'mag was topped with an early
model Revolution loader filled with Great American Paintballs, and taken
to Spacecoast Paintball in Titusville, Florida.
 My
personal mantra, when people asking me "what upgrades should I do to my
Automag?" is "Never change the internals - that will only lead to problems."
My wife has a necklace that is made of nice shiny and colorful aftermarket
internal parts - every one of which was removed from an Automag by an AGD
service tech - because it was the source of that paintgun's problem.
Airgun Designs is very liberal with their warranty support. With
their star program their warranties pass 90 days, and at tournaments and
big games attended by their techs maintenance work and parts are all without
charge. Their one stipulation is that the internals must by Airgun
Designs parts. Using the Centerflag on/off a necessity for the Hyperframe
violated this.
My
personal mantra, when people asking me "what upgrades should I do to my
Automag?" is "Never change the internals - that will only lead to problems."
My wife has a necklace that is made of nice shiny and colorful aftermarket
internal parts - every one of which was removed from an Automag by an AGD
service tech - because it was the source of that paintgun's problem.
Airgun Designs is very liberal with their warranty support. With
their star program their warranties pass 90 days, and at tournaments and
big games attended by their techs maintenance work and parts are all without
charge. Their one stipulation is that the internals must by Airgun
Designs parts. Using the Centerflag on/off a necessity for the Hyperframe
violated this.
 Once
back home, it's shooting like a champ, and not marring the bolt.
Dennis Ashley explained that the solution in this case was using a longer
than standard on/off pin for a perfect fit. Some Hyperframe users
I have spoken to have reported no installation troubles at all, while some
others have reported similar situations to what I experienced, or with
needing to change the Automag's power tube spacer, reporting occasional
"down the barrel" leakage until that change was made.
Once
back home, it's shooting like a champ, and not marring the bolt.
Dennis Ashley explained that the solution in this case was using a longer
than standard on/off pin for a perfect fit. Some Hyperframe users
I have spoken to have reported no installation troubles at all, while some
others have reported similar situations to what I experienced, or with
needing to change the Automag's power tube spacer, reporting occasional
"down the barrel" leakage until that change was made.